MyGmach - My New Open Source App (react native app)
At last I finish another application using React Native for native mobile apps using JavaScript and React, the first one was NachRiddles which is base on my dear brother’s book. MyGmach app is build base on my father idea. Every Saturday my dear brother used to wear a certain tie that was unique to the parsha on that Shabbat. After he passed, my father wanted to open tie Gmach - which is the way in the Jewish world to help each other without getting paid (in Hebrew it is an acronym for kindness which is pronounced Gemilot Hassadim [‘גמילות חסדים’]), and give anyone tie as needed.
After my father told me about is idea, I start to work on MyGmach to build an application that allow to manage privet foundation with items in it, so i wrote document about the functionality that I want to build in that application.
In this post I am going to describe the long way I done to build the MyGmach app.
- Writing your documentation
- Design your app icons and view
- Start building your app
- Changing during building
- Code review
Writing your documentation
The most thing that is very important before you start to write your app is to write documentation about your idea and describe it in details with the following guide line:
- What problem or issue the app trying to solve
- What functionality the app will provide
- What is the target audience
After you will answer this questions, it will be very simple to build the app. In my case I had to write what I told you in the beginning of this post, and I describe every detail that I found important to decide what I want to achieve with that app. I must confess that I also wanted to improved my JavaScript skills alone the way, but the most important thing is go through the idea that base on my dear brother’s ties.
What problem or issue the app trying to solve
In my case I tried to build smart management way to every privet person that have charity or foundation with items to deliver other without getting paid, I search over the net and found some app that do something that is similar to our idea, some of the app can organized objects and others can managing objects, one of the apps is borrow-it, but this app focus on way that people borrow stuff to each other and getting paid, another disadvantage of borrow-it is that this app is available only on app store, that mean that only person with apple device can use this app. Eventually none of those app doesn’t offers what I want to get and allow people to do that can be helping each others.
So lets think about our goal, in mine set we want get some manageable app for items in foundation (which is the ‘Gmach’), we want a way to allow users to create foundation and add items to it, and later on, we want that the user will have the ability to deliver items to people who want to borrow it (LOL) and save the details about the borrow one in the app. After we have the details about that person we want some more things to achieve:
- Connect with the borrow person,
- Save the date the object or items has being borrowed.
- Save the date that person will must to give back the borrowed stuff and returned it.
- Save the history of borrowing the item (for personal use in the future)
- Make some easy way to know what object is available on the foundation and what is not.
- Numbering each object and summarize it.
After we have all that information, it can be great start for our document.
What functionality the app will provide
As we all know, apps that build under the category business, will provides some function the allow the user to find items more quickly, edit items, delete items etc. In this section of the document we must decide what functionality we want to build to make our app more friendly.
so let’s write down the functionalities:
- Allow user to add foundations
- Allow user to delete foundations
- Allow user to edit foundations
- Allow user to enter the foundation
- Allow user add items in the foundation
- Allow user delete items
- Allow user edit items
- Allow user to search function
- Allow user to search item in function
- Allow user to save borrow personal detail under the item he/she borrowed. 10.1 Full names 10.2 Address details 10.3 Phone number 10.4 Date of borrowing 10.5 Date of returning the item
- Allow user to call the person
- Allow user to text SMS to the person
- Allow user to open Whatsapp to the person number
- Allow user change font size
- Allow user to setup alerts
Keep in mined that maybe as long as the developing will take you may find yourself thinking on another functionality that you want to insert to your app. the document need to be guideline and no else. it will help you to achieve your goals more quickly because every functionality is writing down and you know what you need to do, the only question is how to achieve your goals which mean, how to develops that functions. but if on the way you have some another idea, you can applied it to you app. another thing is the way you develop, maybe you will face with some challenge of setting one of our function and to solved it you may found some creative idea and setup another functionality that doesn’t write down in this document. It’s ok to do so, in my case I found my self without document, working on some not so clear idea, and in this situation it’s was difficult to me to start develop it! I set on my desk like five days without progress only because I didn’t figure it out how I am going to implement my app. so keep all this in mined set, you must to make required document about your app to make things progress mote easily
You can also to describe every page on the app, what function will be in what page, how the page will be connect to each other, and some guide line about the view or icons. It’s ok if you trying during the developing to change one or more goals but again, writing it down will help you in the building the pieces.
What is the target audience
it’s maybe not so important, but if you know what is your target audience it’s help you to make the app fit to your audience. as example , if you develop some game the audience is more likely to be children or gamers, so you may know that your app must be whit high graphics and lots of colors to make the app desirable to install and use it. it your app build to help the old generation to do stuff, you for sure know that you must to develop the app in the way it will be more accessible and easy to use.
In my case the app will need to served the middle and old age people, so it must be simple, easy to use, clarify what every button would done, and bring more useful data to the users.
After you finish the document, you can set your chair back down and be proud of your self. no, we doesn’t finish our mission but it is a big progress in our project! now we can jump ahead to the fun stuff :)
Design your app icons and view
Design is also big part, in this part we need to chose colors, icons and main app icon, and of course design the pages of our app. you can design the app on some notebook which is what I have done, but you also can design it using some design program like photoshop (there is no better way to do so) or some build in drawing software on your PC, like LiberOffice drawing on Linux or VISO on Windows.
Lat’s parted the design stuff to more small pieces:
- Main icon
- A standard icons
- A standard colors and view style
Main icon
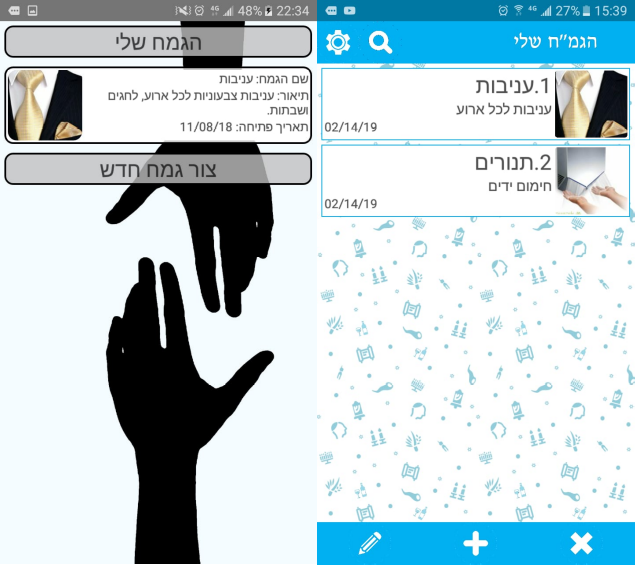
In my case, the app, as I already said, base on kindness to each other, this is mean the people who usually going to use this app will give something to other, so in my imagination the app icon need to be base on giving each, and what best describe that image? two hands that holding each other or give something to each other.
The first icon that I design was base on heart that have red, yellow and pink colors and two hands that look like they trying to reach each other (or one hand trying to help another).
The second one was a simple circle with blue colors and background that base on symbols from the Jewish world with same two hands and charity box.
The last icon and the one that I chose eventually to be the symbol for this app is more simple circle with blue colors and two hand holding each other and making figure of heart together. This is the best icon that I can thinking about for this app. I proud!
A standard icons
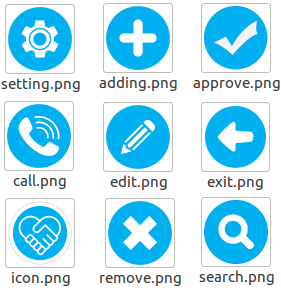
What I mean by say standard is the icons for every button in the app. We want to make the app with unique style and save this style to be the same on every page in the our app. In my case the app symble is already with a certain shade of blue, to be exact it’s with rgb(0,176,240) or #00B0F0. So I use this color in every icon that I made, the ideal is to make it simple, so every button on my app is round blue circle with icon in the middle that figure the action that button will make. As example the delete icon is big whiteX in the middle of the circle.
Other button is the edit, this icon is the same as the last one with blue round circle and the symbol in the center is white pencil.
So every button should be look the same as I describe, same round blue circle with symbol at the center.
A standard colors and view style
As I said earlier, the color is certain shade of blue, for the word in the subtitle I used NARKIS font, and the other is always Ariel. the color of underlines are gray, and every window that popup are white with button of some word like ‘approved’ or ‘cancel’ that have a style of round adges (radius set on 25).
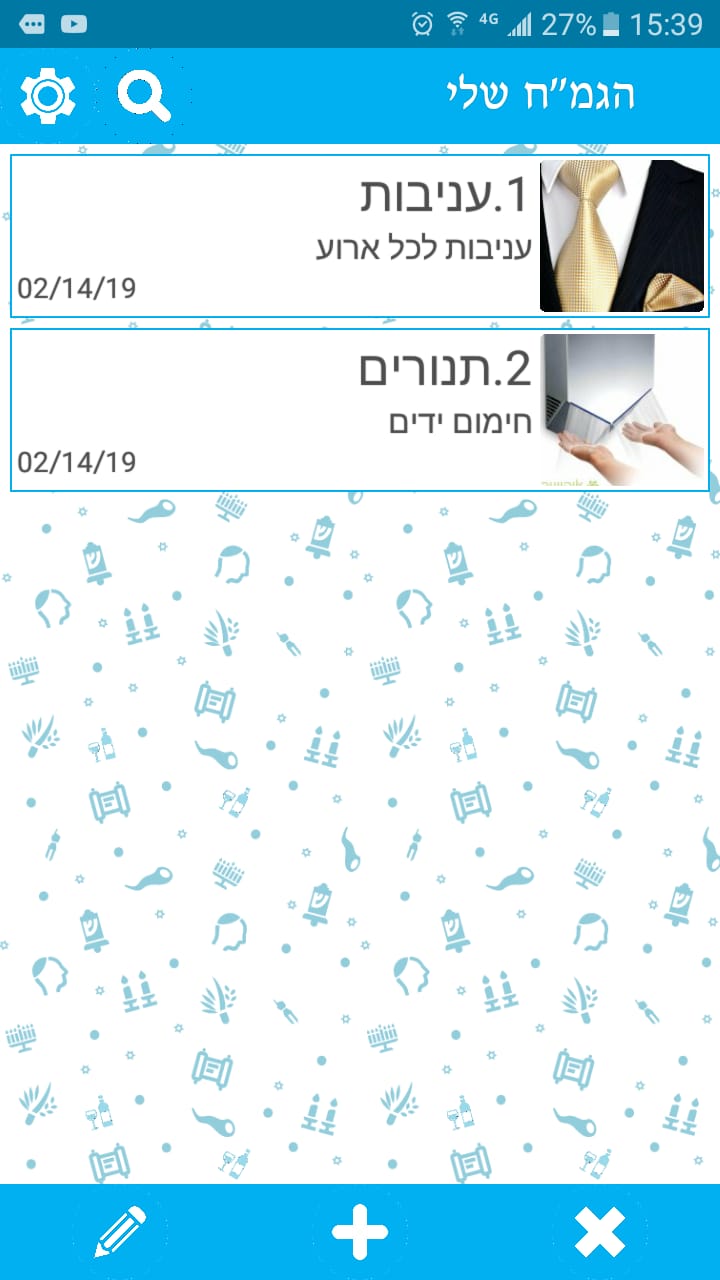
Every page must have a blue headline with the button icons and endline of the button of the screen. the ideal is to use mainly blue colors with white.
I setup the status bar to be blue also because I wanted to keep consistency. The background on every page is (if you remember) base on the same idea that I have on my second symbol for this app.
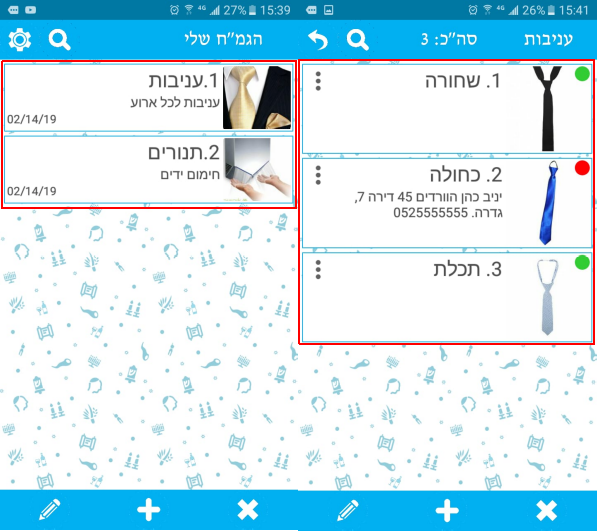
Every page that have list of items, the item itself will be white and with border width of 1 mm, the words will be display in black color and the picture radius will be set to 2 on every item that the user will create as you can see in figure 7.
Start building your app
OK it’s time to code. As I said earlier, my app base on react native, this is mean that the code is base on JavaScript and the instruction is base on XML, which make it as JSX with tags like in HTML. another thing, in React Native we have what we called “Components”, in every component there is block of code that can be available to others components, this is make the app Native, you can use later on this code everywhere.
If you don’t familiar with React Native please refer to the following link before you continue to read:
The first thing that I done is to set the app.js (located under the app folder) to be as follow:
1
2
import App from "./components/App.js"
export default App
In this case I render the App.js that located under components folder (which there lyes all my other components) and export the App.js as default which mean that this is the default components that use to open.
In my first page I was need to create the following buttons:
- Setting
- Search
- Edit
- Adding
- Delete
In the setting button we will use navigator to pass the user to the settings page. there the user will have the ability to change the size of the text, to enable alerts about the returning time for some objects in every foundations, and of course to be able to check for updates. To use navigator we need to install it via npm:
1
npm install --save react-navigation
After the installation, we need to call it in our code using:
1
import {createStackNavigator} from 'react-navigation';
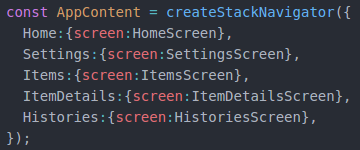
In our app.js file we setup the navigations stuff, on every page that we want to make some button to bring up the user another page, for that we going to use navigator, and this is done only in the App.js component.
To navigate to other page we need to import the destination page to the navigator and call it. Down in the component we need to create permanent variable (const) that contain the name of the screen that we want to navigate.
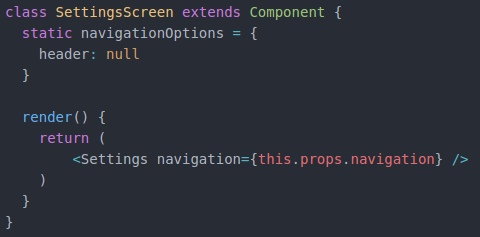
The other thing and the last one is to make that calling of that screen and render it by create class components and from there navigate to the destination screen.
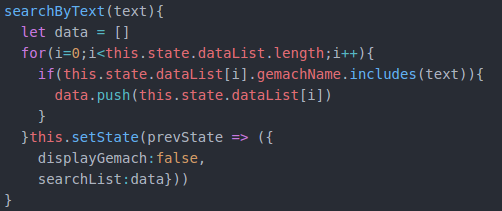
Now, let’s look and the Home page. As I said earlier, we have 5 button in the home page, the setting button only navigate to the setting page. The search button would need to open dome searching box that allow the user to type there what he want to find. For making it smooth, we want that every character that the user type in, we will render the appropriate values that contain that character in the string.
The state is an array that contain the dictionary for keys and their values, so the first thing that we need to do is go through every value in that array and check if it contain the character we searching. if we find it we return the value to another function that render it out the screen.
The next function is edit, to bring this function to work we need to allow the user to chose the item he want to edit. In the button component we have two options:
- onPress
- onLongPress
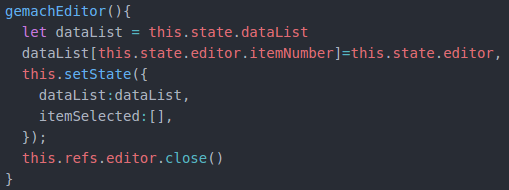
So, I decide to allow the user to edit item by select the item with long press option. I setup some function that change the color of the selected item for the interaction with the user that the item was selected. By press on the pencil at the bottom of the screen the editor menu will open up with the current value on the selected item, if the user will change the values and press OK, it will run function to make the change on the state.
1
2
3
4
5
6
7
8
9
10
11
12
13
14
15
16
17
18
19
20
21
22
23
24
25
26
27
28
29
30
31
32
33
34
35
36
37
38
39
edit(){
  let dataList = this.state.dataList
  if(this.state.itemSelected.length>1){
    Alert.alert(
      'שגיאה',
      'יש לבחור פריט אחד בלבד',
      [
        {text: 'אישור', onPress: () => {
          this.setState({itemSelected:[]})
          for(a=0;a<dataList.length;a++){
            if(dataList[a].selected == true){
              dataList[a].selected=false
              dataList[a].cardBackgroundColor='white'
            }
          }
          this.setState({dataList:dataList})
        }, style: 'cancel'}
      ],
    )
  }else if(this.state.itemSelected.length==1){
    for(a=0;a<dataList.length;a++){
      if(dataList[a].selected == true){
        this.setState({
          editor:{
            key:dataList[a].key,
            itemNumber:dataList.indexOf(dataList[a]),
            date:dataList[a].date,
            gemachName:dataList[a].gemachName,
            gemachDescription:dataList[a].gemachDescription,
            pickedImage:dataList[a].pickedImage,
            cardBackgroundColor:'white',
            selected:false,
            itemsList:dataList[a].itemsList,
          }
        })
      }
    }this.refs.editor.open()
  }
}
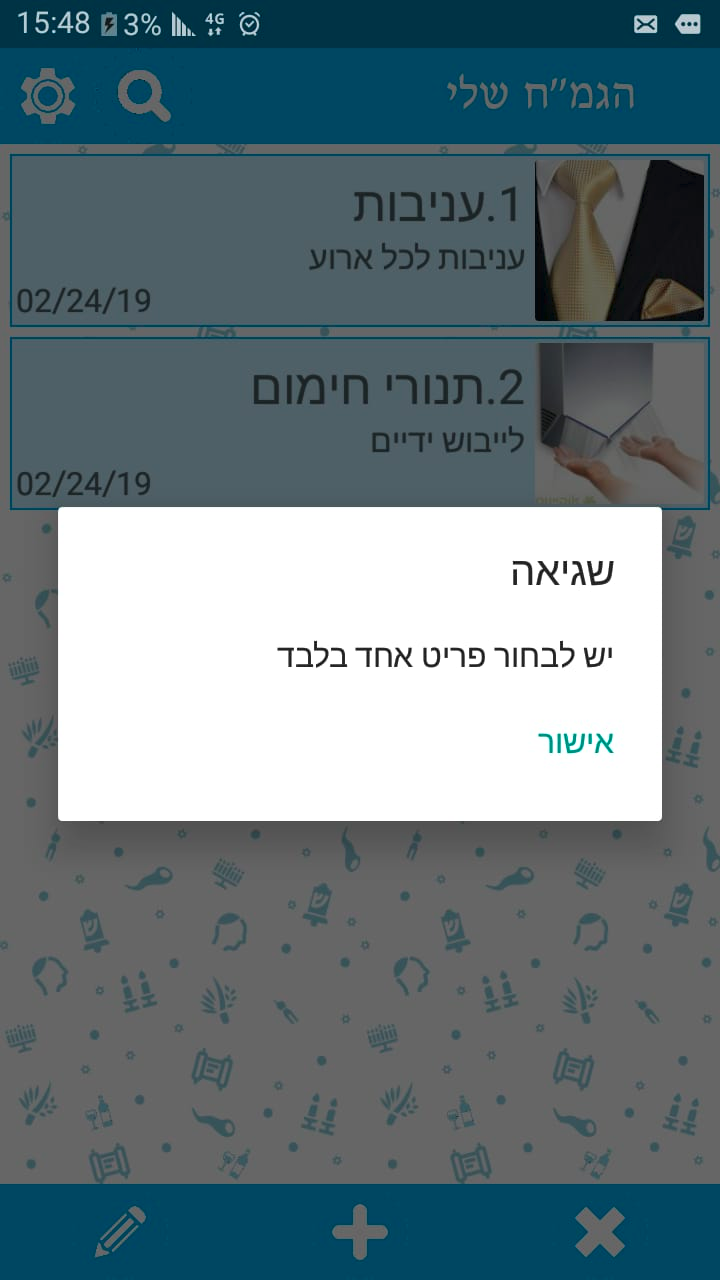
As you can see, if the user select more then one item, an popup message will appear with alert about the last action.
The next function is adding, this is simple one. we just bring the user popup message by using modal box:
1
npm install react-native-modalbox@latest --save
We just take the values and setup our state and use this State later on for render the values that was typed: 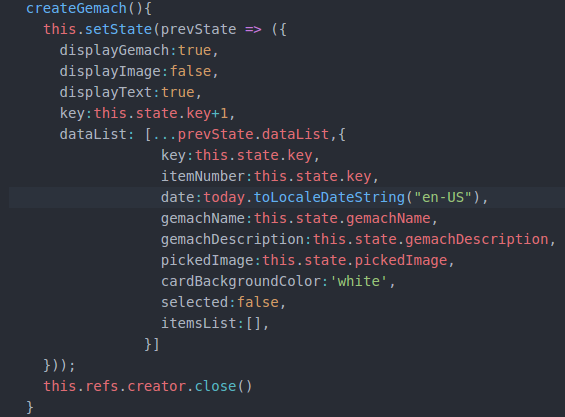
The delete function is simple as the last one, because we already have the “selected” function we can use it to delete every chosen item.
After the user setup foundation item he can navigate to the list of items that he have in that foundation. I that screen the functions and buttons are the same as the first one so I just copy past the first screen which is the home screen and make some changes on the new screen which I called items, because he render the items list that related to that foundation.
note: Because I just copy past every screen, I had a lot of issues on the second screen. The navigator doesn’t work well, some function doesn’t work as I wanted and other worked fine, but the main issue was the dame style view that doesn’t get the shape that I want to make on that screen. So please be careful if you going to build app by copy stuff and past it all over the time. The time you spend on it later is not worth it!!!
The delete or remove function is simple, the principle is the same as the edit function, we take every element the appear to be selected and remove it fro out list and again set the state. to be sure that the user will immediately see the changes we use componentWillUpdate witch in React Native allow us to re-render the state once again and make the changes we need .
1
2
3
4
5
6
7
8
remove(){
  let newList = this.state.dataList
  for(a=this.state.dataList.length-1;a>=0;a--){
    if(this.state.dataList[a].selected == true){
      newList.splice(newList.indexOf(this.state.dataList[a]),1)
    }
  };this.setState({dataList:newList,itemSelected:[]})
}
Before we remove the item we want to make dialog with the user about the deleting items. If the user select one item we alert about one item will be delete. are you sure? or something like that. If the user selected more than one item we will alert about that too, the selected items will be delete. are you sure?. And after that we run the remove function that displayed earlier.
1
2
3
4
5
6
7
8
9
10
11
12
13
14
15
16
17
18
19
20
21
removeApproved(){
  if(this.state.itemSelected.length==1){
    Alert.alert(
      'מחיקת קרן',
      'האם למחוק את הקרן שנבחרה לצמיתות?',
      [
        {text: 'ביטול', onPress: () => false, style: 'cancel'},
        {text: 'אישור', onPress: () => {this.remove()} }
      ],
    )
  }else if(this.state.itemSelected.length>1){
    Alert.alert(
      'מחיקת קרן',
      'האם למחוק את הקרנות הנבחרות לצמיתות?',
      [
        {text: 'ביטול', onPress: () => false, style: 'cancel'},
        {text: 'אישור', onPress: () => {this.remove()} }
      ],
    )
  }
}
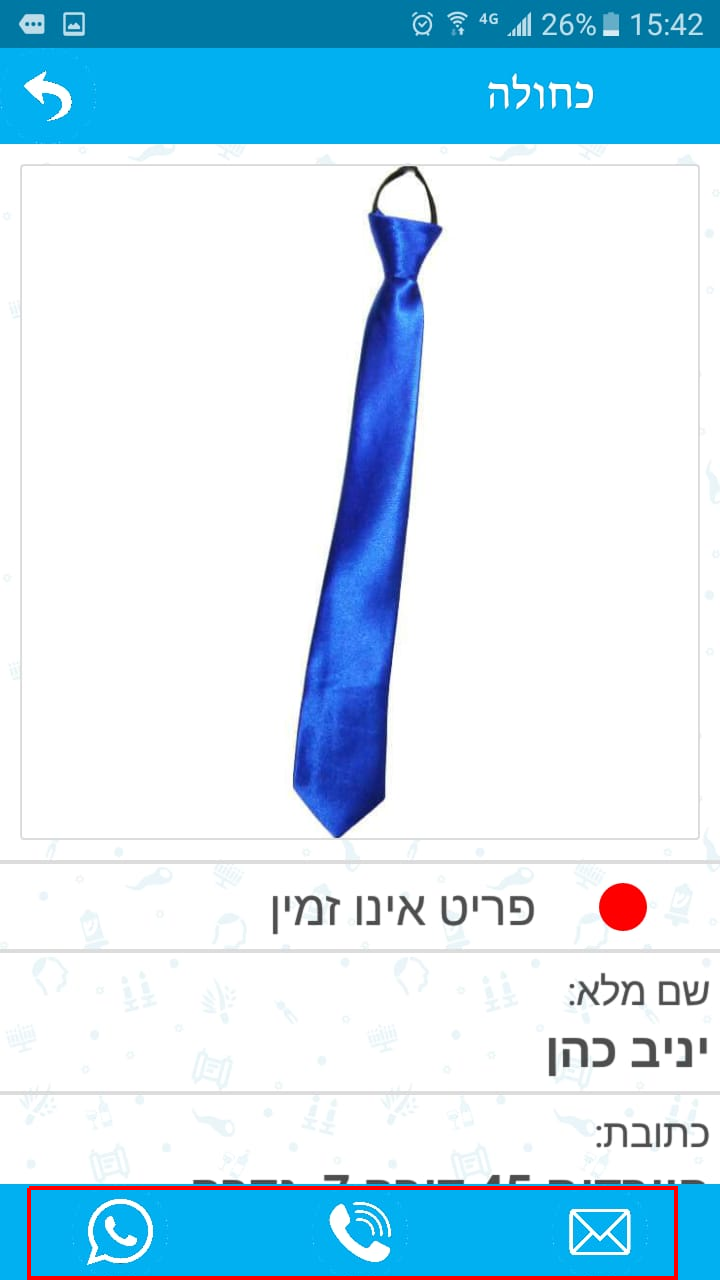
So the first screen are ready if we account only the functionality of that screen. the other creen contains much the same functions. the only screen that have new element on our app is the item itself. If some user take item from our fundetion, we will save his details on the item that he borrowed. after that we want that the user will have the ability to make a call from that screen or send SMS or Whatsapp message. To do so we need to setup the following:
1
2
3
Linking.openURL(`sms:${this.props.navigation.state.params.itemsList.customerData.phone}`)
Linking.openURL(`tel:${this.props.navigation.state.params.itemsList.customerData.phone}`)
Linking.openURL('whatsapp://send?phone=+972'+this.props.navigation.state.params.itemsList.customerData.phone.substring(1))
The props navigation contain the details of the customer, so we use it to be like other application by using the phone number of that customer.
There is more thing that you must know, by building this app I setup the style on the element itself like the follow: 
This is NOT readable code! so we will go through Code review to see how to make it better to be readable.
Changing during building
On every screen I setup the functionality the as I wanted to be, after I build another screen I goat some issue in the code that force me to change the terminology of the functionality, if I had some function that use the state, later on I change that state and that force me to change the functions that use this state.
in that example I made some changes on the card section, The Card component is display the foundation and by pressing it you navigate to the screen of that foundation, to select item on the home screen (which is the foundation itself) you need to made long press, that action change the value of the selected in the foundation from false to true, and if selected is true, on the map function we render every item on the dictionary to be with some blue color to state that this item was selected.
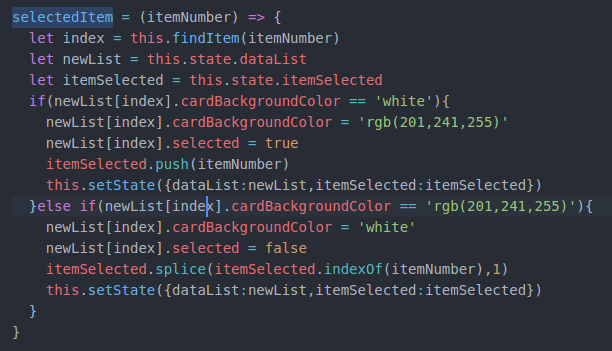
I write some function named this.selectedItem() that change the selected key on every item that selected by the user, so the selected item in the end of the day should look like that:
1
2
3
4
5
6
7
8
9
10
11
{
  key:this.state.key,
  itemNumber:this.state.key,
  date:today.toLocaleDateString("en-US"),
  gemachName:this.state.gemachName,
  gemachDescription:this.state.gemachDescription,
  pickedImage:this.state.pickedImage,
  cardBackgroundColor:'white',
  selected:false,
  itemsList:[],
}
the issue was that this.selectedItem() was on the Card screen and that not useful because I cant make change on the foundation itself because the Card is only way to render the view of that foundation. the changes need to be on the home screen were the all magic is done.
After I moved the selectedItem to home screen, I need to call it from the card screen to make the selected functionality and render it again to display the changes.
1
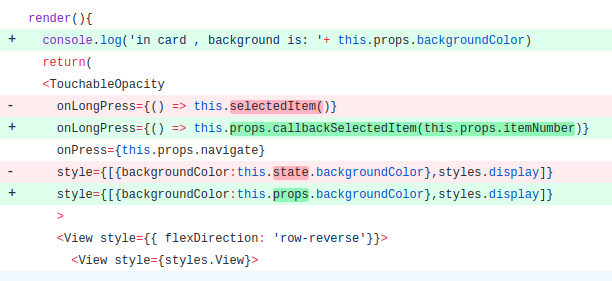
onLongPress={() => this.props.callbackSelectedItem(this.props.itemNumber)}
on the home screen I make the map function the callback to run the funtion from the home screen. So every time that the user made some long press on some foundation, in that case the callback is go to action and call the selectedItem() function and made the changes on the state that are in home screen.
1
this.setState({dataList:newList,itemSelected:itemSelected})
The second change that I made was on the style view of the Card:
1
2
style={[{backgroundColor:this.state.backgroundColor},styles.display]}
style={[{backgroundColor:this.props.backgroundColor},styles.display]}
I done that change because in the first place I pass the props to the state and trying to render it after that. The issue there is to render the changes that I make to the state because the passing value to card is the first step , set it on the state of Card is the second step, made change to the state is the third step and render it is another step but I can’t render something that already rendered.
1
this.state.backgroundColor
To do so we can made the changes on the home screen and use the props directly on the code which is render as we wanted.
1
 this.props.backgroundColor
You also may made some changes in the style, the first screens that I made was gray with some button that I change later on. I made a lot of changes in the style, the documentation need to state how the app will look like, but if during the building you find something that may be more sharp or beautiful for your app you can change it and state it in the documentation later on. It’s make your work to be more arrangeable and you may see many benefits by working like that.
Code review
In this section, the important things are related to two points the the code need to be made:
- readable.
- manageable.
Those two point always go together, if you can make the code to be more readable, you can in the future to manage it more quickly, and if the code is more manageable, you can be sure that it’s readable becouse if not - it’s not manageable.
To do so we need to define the principles that can help us more later on building the app or manage it or make some changes after we finish it.
- Functionality
- Style
- Components for screens
- Components for display that repeat it self.
The functionality is my case is JavaScript functions, so I can make some one and only file that contain all my funtions. This will help me to manage it in case I will need it on one place. On every component that we will need to use some function from that file we will call it by using:
1
import <function> from ./location/of/the/func/file.js
On the functions file we need to export every function:
1
2
3
export const function = (value) => {
  some code...
}
We need also to go on every function and if we can to change it to be simple to read as possible. I found that if the code is shorter, it help to be more understandable to the person who read the code, as example I done in the past the follow challenge in python:
https://www.hackerrank.com/challenges/list-comprehensions/problem
1
2
3
4
5
6
7
8
9
10
11
12
13
14
15
16
17
18
19
20
21
22
You are given three integers  and  representing the dimensions of a cuboid along with an integer . You have to print a list of all possible coordinates given by  on a 3D grid where the sum of is not equal to . Here,

Input Format

Four integers  and  each on four separate lines, respectively.

Constraints

Print the list in lexicographic increasing order.

Sample Input 0

1
1
1
2
Sample Output 0

[[0, 0, 0], [0, 0, 1], [0, 1, 0], [1, 0, 0], [1, 1, 1]]
Explanation 0
the code I made was something like that:
1
2
3
4
5
6
7
8
9
10
x, y, z, n = (int(input()) for _ in range(4))
list1 = []
for a in range(0,x+1):
for b in range(0,y+1):
for c in range(0,z+1):
if a + b + c != n:
list1.append([a,b,c])

print list1
To make this code more simple and shorter as possible, you can do something like that:
1
2
3
x, y, z, n = int(input()), int(input()), int(input()), int(input())
print ([[a,b,c] for a in range(0,x+1) for b in range(0,y+1) for c in range(0,z+1) if a + b + c != n ])
It’s make the code more simple to reade, more simple to manage and more shorter. The same is in our case, if you finish the app and you on the code review part, you can make it simple by change the code to be more readable and more shorter. Again, if in the future you will want to change something in the code, you will can do so more quickly.
The style also can be in separate file from JSX files, don’t forget that the style is also something that repeat itself so we can make some StyleSheet that contains all the style and called it on every components like in the functions example and use it on our style code on JSX.
1
2
3
4
5
6
7
8
9
10
11
12
13
14
15
16
17
18
19
20
21
22
23
24
25
26
27
28
29
30
31
32
33
34
35
36
37
38
39
40
41
42
43
44
45
46
47
48
49
50
51
52
export default const styles = StyleSheet.create({
  fontStyle:{
    fontFamily:'nrkis',
    fontSize:StatusBar.currentHeight,
    color: 'white',
    alignItems:'center'
  },
  header:{
    backgroundColor: 'rgb(0,176,240)',//#00B0F0
    borderColor: "#008CBA",
    flexDirection:'row',
    justifyContent: 'space-between',
    alignItems: 'center',
  },
  button:{
    justifyContent: 'center',
    height: barHeight,
    margin: 5,
    borderRadius: 25,
    borderWidth:1,
  },
  modalbox:{
    justifyContent: 'center',
    height: null,
  },
  textInput:{
    flex:1,
    fontSize:StatusBar.currentHeight,
    borderColor: 'gray',
    margin:2,
  },
  ViewTitle: {
    width: ((dim.width-22)/4) * 3,
  },
  imageBox:{
    backgroundColor: "white",
    borderColor: "black",
    borderStyle:'dashed',
    borderWidth:1,
    borderRadius:2,
    justifyContent:'center',
    alignItems:'center',
    height: dim.height/6,
    width: dim.width/3,
    margin:5,
  },
  previewImage: {
    width: "100%",
    height: "100%",
    borderRadius:2,
  },
});
For every screen we will setup separate component, and if that component contain some section to display that repeat itself always on our app screen we can separate it two to other component. As example my card component that display the foundation on the home screen, the items on that foundation are display like the foundation itself in some card box, so we can use it instead of creating new component for this screen view again.
This is it guys!
You can find this app on Google Play for now, in the future I will upload this app to Apple App Store. To install it on android refer to the following link: 
Please write comment here for question and I will be in touch with you shortly. Best regards!
Guy. Z.

