H@ck3rs Playpost - my journey in offensive cybersecurity field.
I set myself a lot of goals this year to advance to the next level, among all the goals being the PENTEST certification from Offensive Security. It’s been a certification I’ve been talking about for years, since 2012, it’s really time to sit down and do that certification. It all started when I was writing in a forum on computer communications, where I presented the dilemma, whether to study information security of companies that are involved in the field or something else when my goal is to be an expert in the cyber world.
Eventually, someone responded to me, depending on what I want to learn, whether I want to be on the attacker or on the defensive side, he introduced a number of certifications and wrote about each certification separately. Among all the certifications he presented were Cisco certificates, Check Point certificates, and all sorts of large companies that manufacture and market security sites that protect the entire corporate network.
The certificate that I saw among the list included Offensive Security and dealt with the Offensive field with the goal of giving the student tools to perform penetration tests. I went into their site and saw that the whole Offensive area is divided into several levels and on each level there is another part which is a whole world.
I decided that was what I wanted to do, as Joseph McCray said in his lecture on Defcon 17, “That’s what I’m going to do.”
 Figure 2 Joseph McCray on Defcon 17.
After you finish the exams, which are made up of a lab that has a number of boxes to break, you get a certificate on their behalf with an Offensive card, and anyone who knows me knows I love these wallet cards.
 Figure 3 PENTEST Certification with wallet card.
In short, this year it is time to do this certification and not give up until I finish the whole book. There is a booklet that goes around the Internet, if you are interested in the booklet and you do not find it, email me and I will send the booklet to you.
In this post I will present my studies and maybe later I will make some videos that show how things work. Important to remember, reading this post requires basic Linux knowledge, browser familiarity, HTML & CSS / JS, computer communication, familiarization with security solutions, and knowledge of Internet usage. If there is something you read and do not understand I recommend searching Google and coming back to read the post after that, I try to expand on everything I present here, but there are things I do not want to overlook.
If you are familiar with Linux, getting started with the material will be easy for you, if not then it is better to get acquainted with the Linux operating system and return here to continue learning. In this course we deal a lot with the Kali operating system which is Linux based and very similar to Debian.
Chapter 1
Let’s get started
Kali contains a lot of tools for performing attacks or planning actions and the Ofer work with it is no different than any Linux system that exists. So let’s get started
Find files in Linux.
These all three commands work the same, they allow you to find location of some file, the difference is that every one display results in other way.
Before you trying to use these commands you need to update your database which is contain the location of every file on the database
updatedb
By run this command a mlocate.db file will created and this is how the locate or which and find can locate every file on your computer
 Figure 4 In my case I had to run into sudo because of permission I’m guessing.
After that I run the which command, this command find the location of directory that defined on $PATH,
 Figure 5 In my case I had to run into sudo because of permission I’m guessing.
If you check the &PATH by using echo $PATH you will find it, in my case I used which zsh which is my command line command that I love to use on my ubuntu, on the $PATH there is a /usr/bin folder which contain my zsh folder.
 Figure 6 My $PATH that contain zsh in side /usr/bin/
The locate command used for find some file, when you run this locate it display to you with the full path of the file you search for.
Please remember, if you run the locate with part of the name string of the file, it will find every file that contain that string.
The find command is more aggressive, with that command you can find every file by specifying directory, in my case I search for USB2.0.exe, but let’s supposed that I don’t know all of that file string, so I can write as the following.
In that case I search on specifying directory and append ““ to USB and find every such file that contain that string.
Changing Password
If you install Kali you probably didn’t ask for use and password, so the default user and password will be as follow: username: root password: toor
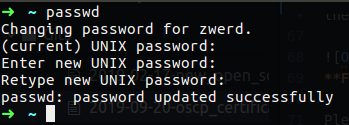
It’s a good idea to change the password to the machine, if you make an attack and someone comes at you, you probably don’t want it to be able to log you into the machine and see what you do. For that case we use passwd command.
telnet
The telnet command being around since 1969, we used telnet for connect to remote machine terminal or cli, we can using telnet to connect from our linux machine to remote windows and versa. in the most cases telnet service used port 23 which we can change it and use other port.
I think the most open telnet terminal over the Internet is towel.blinkenlights.nl, you can try it yourself and it will bring you to terminal that present the start wars movie.
telnet towel.blinkenlights.nl
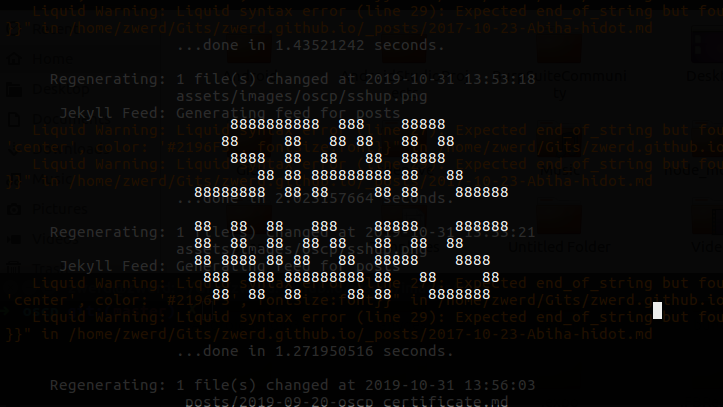 Figure 10 starwars over telnet.
SSH
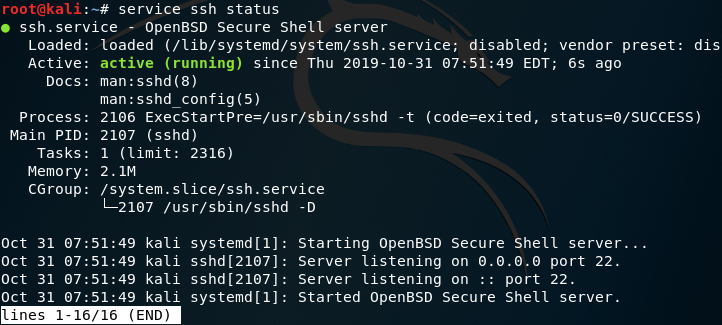
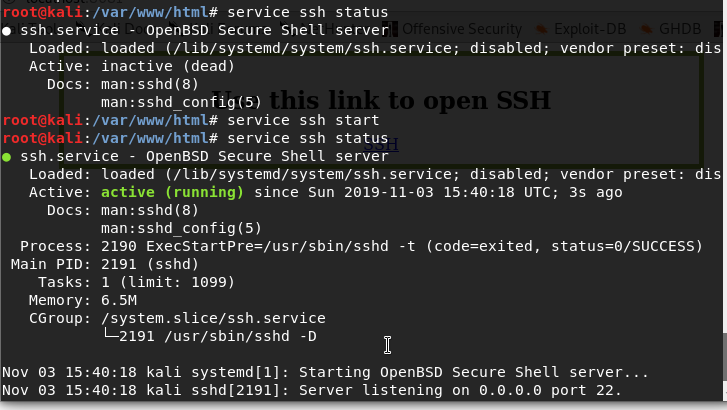
SSH is our way to use remore connection like telnet but as more secure way. On telnet everything transferrer as clear text, on ssh it encrypt the all the session between two point. If you wnat to check if you ssh are running or check it status you can use service command.
In my case the ssh are down, so to bring it up I need to run the following, please note that for exit the operation you can press on Ctrl+C or just q.
We also can check if the service is using port 22 as ssh do by using netstat. In my case I using grep to included only sshd.
I most of the time user netstat -tuna command which show on cleare way the network connections, or netstat -panel command which display also the process that run each connections.
In many cases you, like many, will wanna to setup ssh for run at start time of your machine, to do so you will need to use update-rc.d which is script that allow you to enable services to run on start time. you also can check what service enable on update-rc by view rc
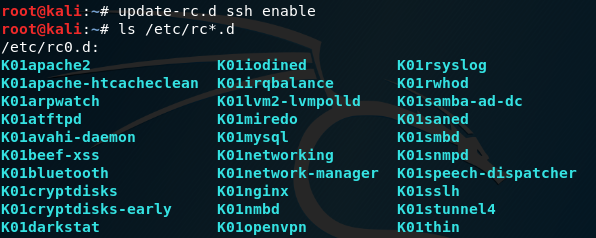 Figure 14 The services that killed at boot time.
In that folder we can find several services, the principle work as follow, every service can have K or S at the start for the file word which mean KILL or START respectively. Also there is the ordering by number the lower one will take action first. As example you can see the K01nginx which is the local proxy service and is going to be kiiled after the K01appache2 will killed down. If we want some service be running at boot we just need to change it fro K to S.
HTTP
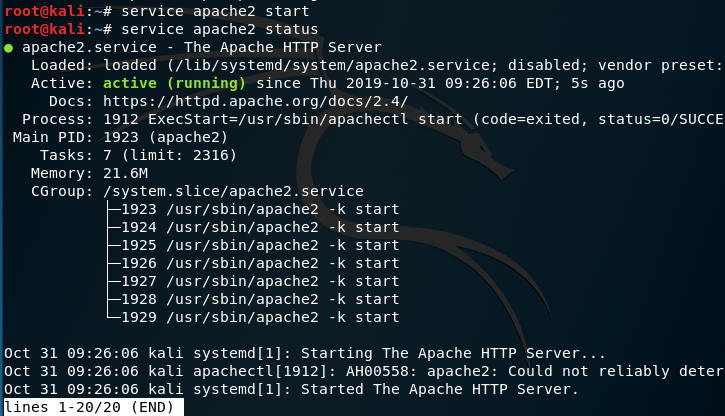
We can use in HTTP service to do several thing on the penetration, as example bring up some web and perform some action that make out victim to download some file from our hosting machine. In the most of the time if someone connect to some web server (which dosnt include secure connection), he likely going to use port 80 to connect this site. On linux we use most of the time apache2 service to bring up some web services the host on our machine, to start apache we will use the service command.
Again, you can check it by using the netstat command that will show you if the port active on LISTEN. In my case I using grep for display only service that using port 80.
tip: To check what every option on netstat or any other command does, you can use man page by typing man
After that, if you want you can see the web you are hosting on you computer by using the browser, you will anly need to check your local address with port 80 or type 127.0.0.1:80 on your browser.
Web Ingredients.
Most of the elements on which many sites are based in the Internet space are: HTML, CSS, JavaScript. Each site contains HTML code, which allows us to choose the style of our text, size, position, hierarchy, etc. At CSS we use to get a more interesting look, change image sizes, add colors, create different font and font sizes, and even build tables, these two components actually make us the body of the virtual machine we created. And here’s where JS came into the picture. JS puts far beyond the font or color, is the brain behind our virtual machine, you can make moving images with it, change colors, change font or background sizes, do it automatically by a few seconds or when the user moves the mouse over the background, it all depends You set him up to do.
Since I’m only at the beginning, we won’t go into the depth of things, much of what you need to know right now if you don’t know HTML is its structure. The HTML is made up of tags just like XML files, we can find inside <html> </html> when the first one opens the document and the last one closes it, all the difference is the small slash /. Information that should be hidden from the user’s eyes such as a CSS style or a JS file that should be loaded while the page is running will all be written between the <head> </head> tags. Information that the user should see will appear mainly in the <body> </body> document.
There are many other types of tags, such as <img> that we use to insert an image into the HTML page, or the <a href="/some/url/path"> text <a> used to create a link that, if clicked, will take us to the url we placed in href, there is the <p> </p> used by us to create a paragraph and many other types that can be used by us.
It is important to know that for each tag we want the CSS to handle we will use the example class
1
<p class = "paragraph"> this is test <p>
In fact, if we called CSS through a file or we used
1
2
3
4
.paragraph {
font-size: 10px;
color: green;
}
The same text that will be written inside the paragraph we created will be 10 pixels in size and green.
JS works in the same way only that for use it we use the id option instead of class
Before we move on, I recommend reading some of these topics a bit or seeing a video that talks about them and come back here and keep going. If you have come to challenge yourself and you do not know these concepts, continue to the upcoming challenge.
Challenges 1
- You need to bring up some webpage on your local PC using apache2.
- The web page need to use other port that 80.
- The web page need to be simple and contain some link for ssh terminal.
- By click the link it will open terminal to your PC.
You can do the exercise alone and after that comeback to continue reading and see how I did it, or you can read all it through and do as I done. I encourage you to do this exercise alone, in this way you sharpen your ability to become familiar with the technological space at your disposal to do things that will help you with an penetration test.
1. Bring up Web Page
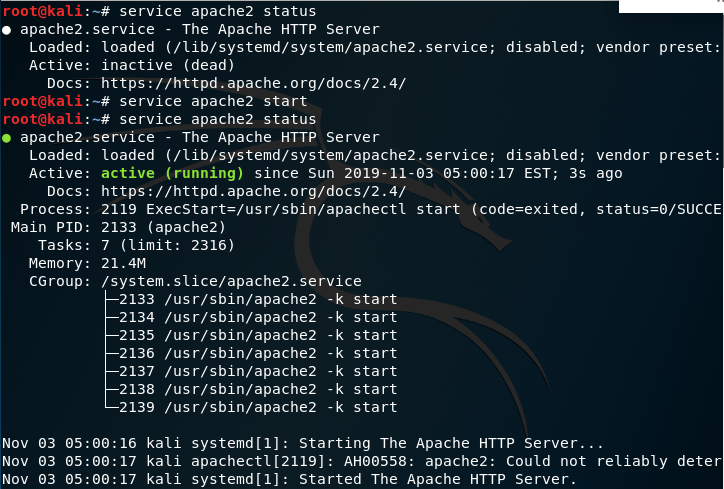
First we need to start apache2, I restart my machine and find that apache2 on down state, so I bring it up.
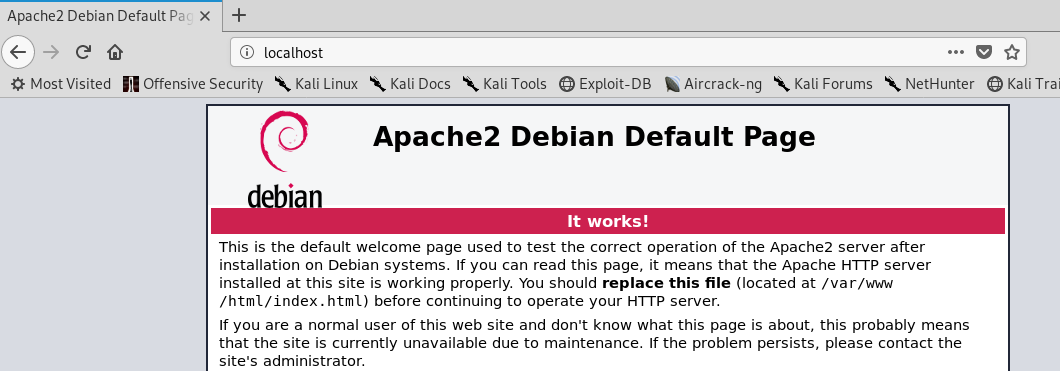
After I done so, I open my FireFox browser to see if I can view the default page of apache2, on that page I type in localhost which is by default use port 80. Also on that page there is some thing that can help us with the exercise, like the configuration of that page.
 Figure 20 apache2 configuration at the default page.
We will use the information of that page for the followup exercise. We also can check to see what is the port address, becouse we cant see it on our browser, so, we use netstat which can bring us that information. In my case I grep that information out.
 Figure 21 netstat information for apache2.
2. Setup other port for our localhost wepage.
As was specifying on the default apache2 page, the configuration for port number can find on the foolowing path: /etc/apache2/ports.conf. After reading the information in that file I setup new port number 8081 and restart the apache2 service.
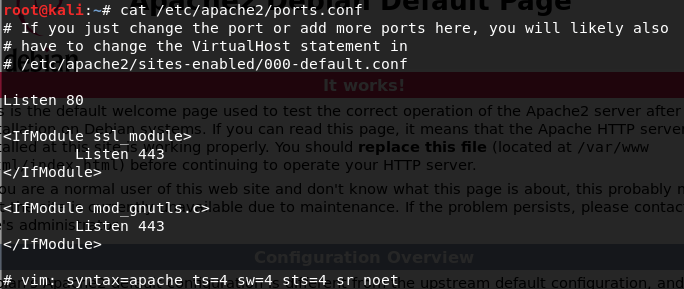 Figure 22 port number configuration.
I use vi to change that, I run it with sudo to be sure that I be able to save the changes becouse of permission issues. I specify Listen 8081 which tall apache2 to listen to that port and bring up the page.
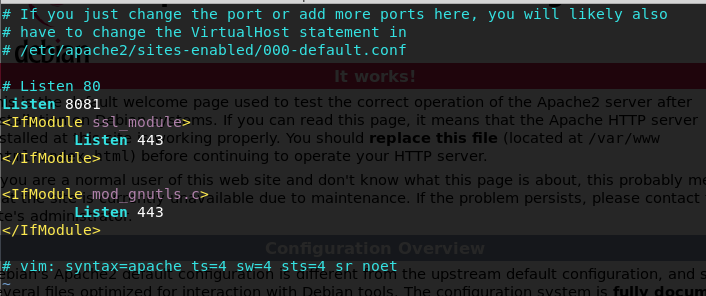 Figure 23 Adding port number 8081 to config file by using vi.
I openup my browser again and type my localhost with port number 8081 which look like as folloe: localhost:8081, and it bring up the default page again.
 Figure 24 The default page on port 8081.
3. Create new web page with SSH link.
On the default page of apache2, specify that if you want to change the html file you can do so by changing the file on the www directory. I created new folder named old and moved every file on the html directory to this new folder.
 Figure 25 The path for www directory.
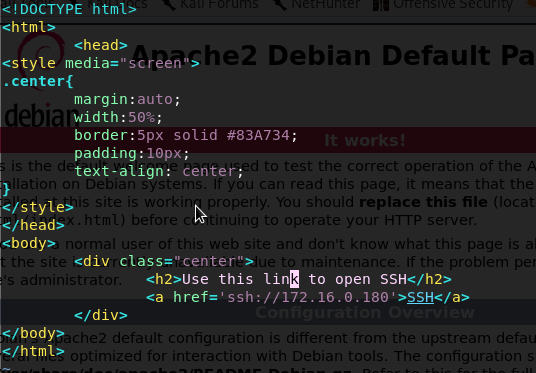
After that I was created new file with touch command, and vim it to make my new webpage with the ssh link inside it, I used **
after I finish, I went back to my browser and refresh it, my page will bring up with the SSH link that I created.
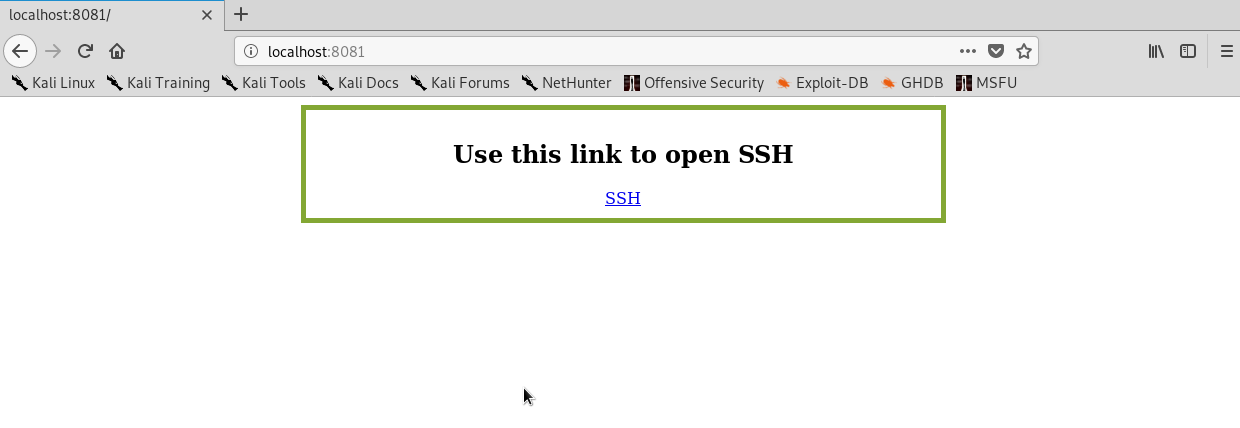 Figure 27 New webpage with SSH link inside.
4. Click the SSH link to open session to our ssh-server.
After I click the link on my page, I had some issue with the link, the browser dosn’t understand what to do with such link and didn’t open new terminal with ssh session.
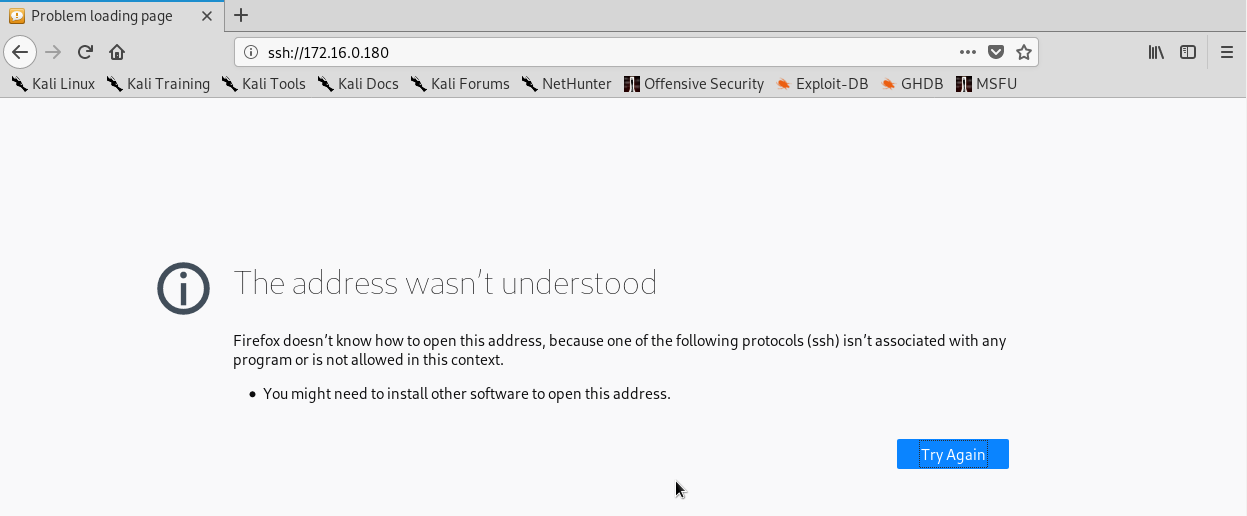 Figure 28 Issue to use the SSH link.
So solve this issue we need to troubleshoot our browser, the question we need to ask our self is why, in my case, FireFox didn’t know how to open SSH, to find and answer we need to be clear about FireFox. FireFox can loadup FTP url, which is mean that he know how to do so, in that case, we need to find a way to tell FireFox that if the user click on link that contain ssh:// in that case please run the following app…
So our conclusion is that the browser should run an app and execute the command, in that case I going to look at the URL like it is the command, so let’s say that our browser know what the app he need to run, my question is how the app does this, i.e. how it takes the URL and converts it to SSH command. so what I came up is the idea to write script in bash to do so. after we will find a way to tell the browser to open the script and run the URL inside it, my script should open an terminal with ssh to the remote machine in my lab.
In my script I know that I need to handle the URL I will get, which going to be something like that: **ssh://
To make new file I using touch and after that I run vim to edit this file.
 Figure 29 touch and vim commands.
So I came up with the following script in bash that can help me with the SSH URLs:
1
2
3
4
5
6
#!/bin/bash
url=$1
protocol=${url//:*/}
machine=${url://*:\/\//}
machine=${machine%/}
/usr/bin/gnome-terminal -e "$protocol $machine"
In the script we save the URL in the variable url, after that we parse the protocol which going to be the ssh, we also parse the machine ip address and remove the slash in the end, after that we open termianl which is the gnome-terminal and execute the “$protocol $machine” inside of it.
When this will done, an new window of terminal will open up and run ssh to our lab machine. Now we need to make that file executable with the command chmod. After that will done, if we run ls command it will show us that ssh-script.sh is executable file.
To check if the script working right, we need to run it, we know that the line that our script will handle will be ssh://172.16.0.180/, so that what we need to insert that script for checking it, also we use the ./ which call the executable file and run it. When I tried to run it I came a cross some issue with my script.
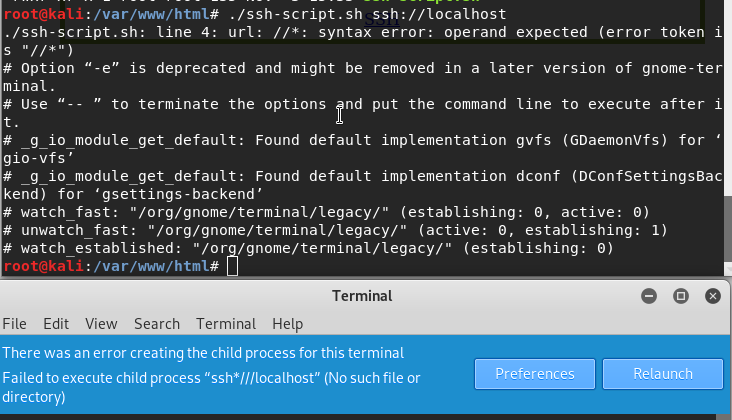 Figure 32 ssh-script.sh doesn’t run as expected.
The error tall us that the is an issue with line 4 on our script, so I checked it out and found some miss syntax, on line four was some unnecessary :, after I remove it I tried to run the script once again.
After that, I check the ssh service status and start it, in my case the ssh service was on down state, Please note: ssh service used to allow our local machine to act as ssh server, you doesn’t need to run it on the ssh client.
I tried to check if ssh on local machine are working right, so I run the follow up command on my local machine
 Figure 36 ssh to local machine.
after it work successfully I run the script with the ssh line that going to be on our local webpage and finally it work well.
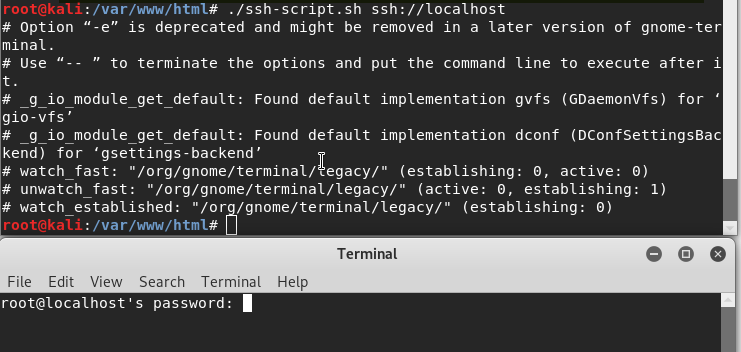 Figure 37 ssh is working to my local machine by using the script.
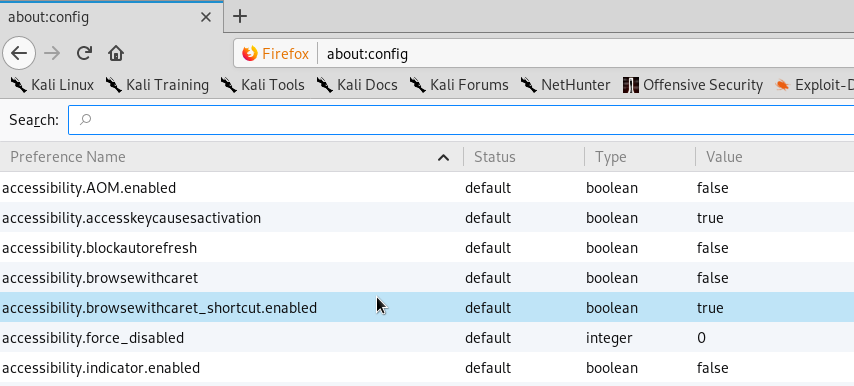
Now, to get the browser work, we need to tell it how he going to execute the script evry time someone click on ssh:// link, I search over the Internet and found that the setup for such case can be found on the config menu, to get that menu on the brouser search box type about:config.
in that config list we need to allow to using ssh and applied it to execute our script in every case someone click it, to do so we need to add new URL Handler, which is network.protocol-handler.expose.ssh, the value for that going to be false, which going to bring the user a popup dialog to choose application to run the link, ehich is going to be our script.
Please note: in my case I wanna to add that setup directly on the FireFox prefs.js file, to file where it locate I used the following command:
1
find / -name prefs.js
That file was found in my case under mozilla folder, after that I add up that line to the file.
 Figure 39 expose.ssh on the prefs.js file.
After I finish all, it’s the time to check if we can use the SSH link to bring up ssh session to our remote lab machine, which in my case is my zwerd ubuntu.
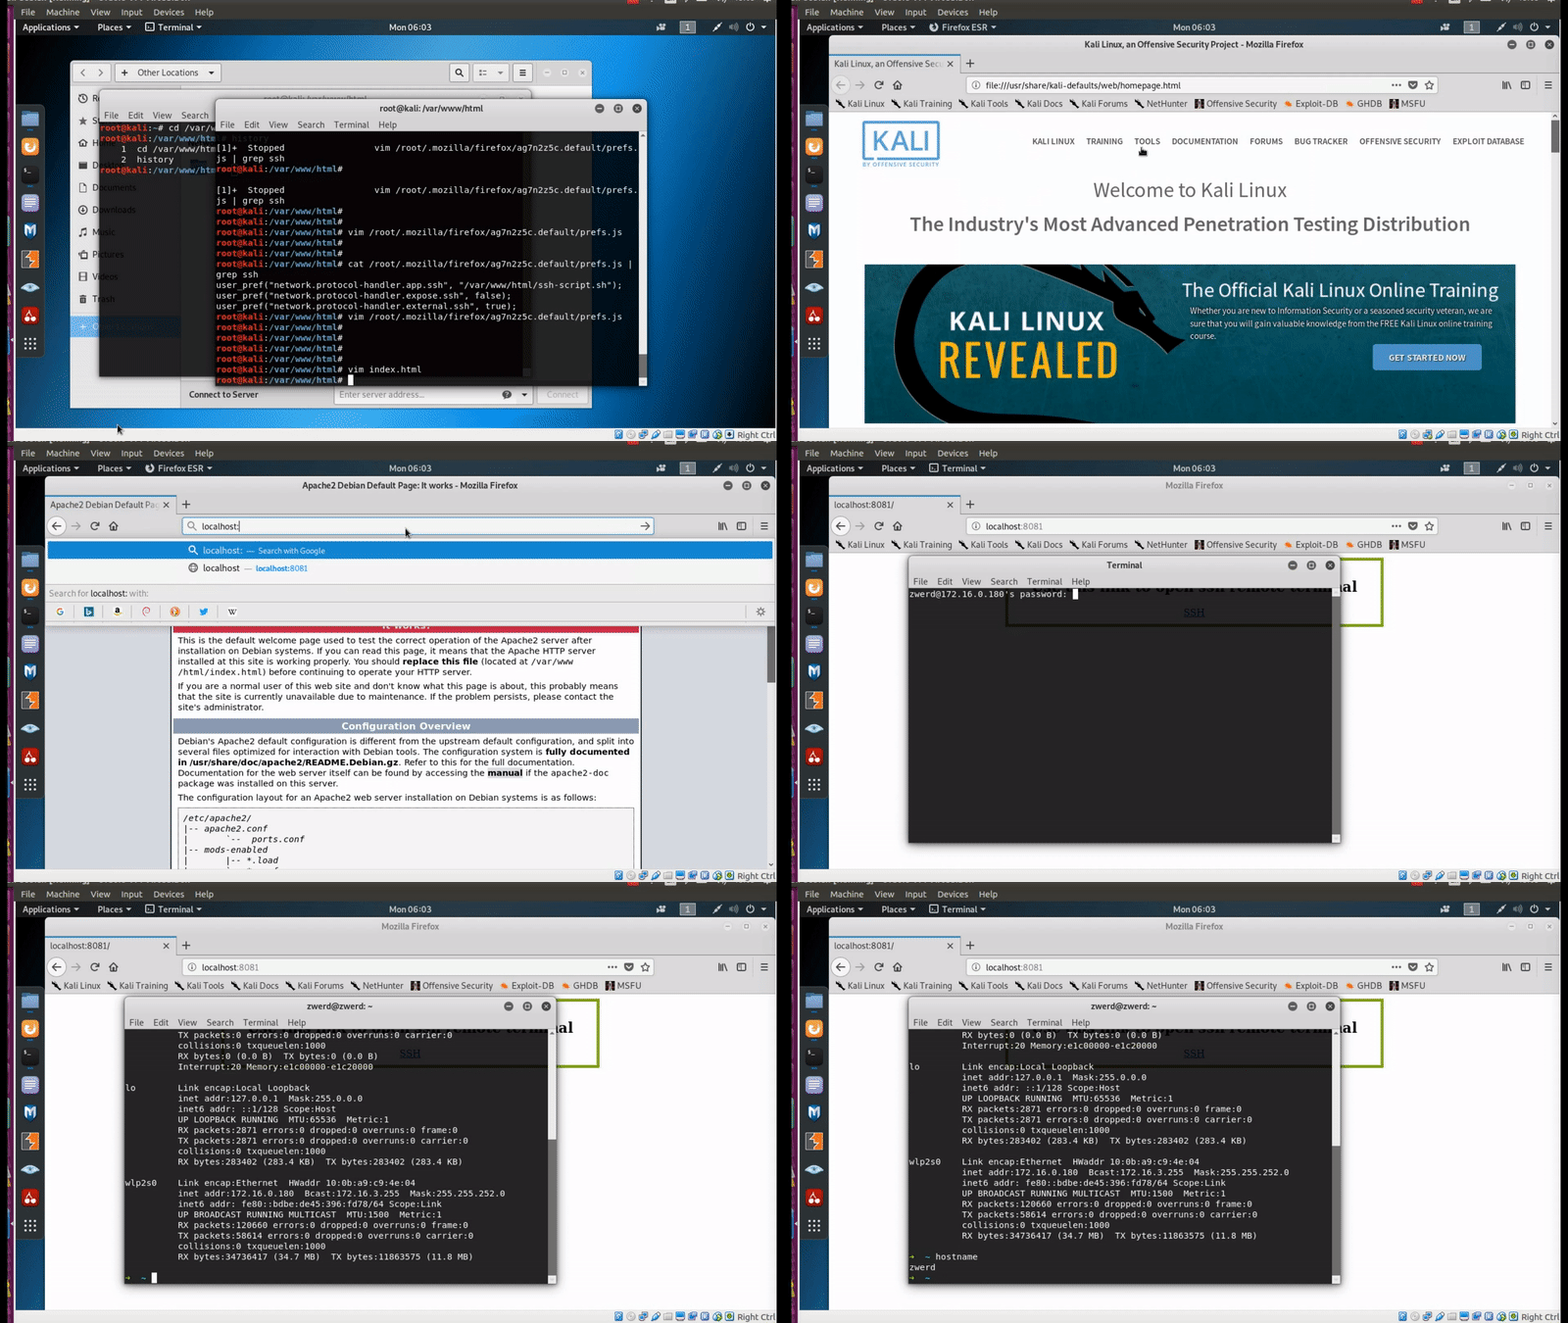 Figure 40 ssh connection opened up.
Summary: Knowing how to operate a computer is very important in the Offensive world, it is important to know many tech areas, like how Linux and Windows operate, how network protocols work, how to build a website, how to link direct from one app to another, and find a way to help us achieve what we want. Most importantly, if there is something that we do not know how to accomplish it, we have tools to find it, such as searching Google, reading articles or guides on the same topic and connecting all the things we need together, this is the logic of the Offensive world in my opinion, should be a little sophisticated, we will see this logic later, it requires us to be smart and think a few steps ahead to succeed in the penetration testing mission.
Chapter 2
In that field, Linux is your best friend!
Because we are going to use a lot of Kali Linux it is a good idea to be with strong knowledge using this operating system. And there is nothing like getting to know the operating system as well as you know its command line. The Linux language used in the terminal is bash and there are many commands that can help us to do such and other manipulations in the system to get what we want.
Linux Commands that you must to get comfortable with
There is a lot of linux command line that I used daily, and the following list are what can help you to operate with Kali and get comfortable with it.
sudo - sudo it the way for us to run some code on administrator privilege mode which use root user.
pwd - will bring you the current directory.
echo - used for print thing on the screen, like variable the saved on the memory to check what it their value or such.
cd - change directory, you will use this command to change your current directory, in the most cases if you want to get out from some directory to it’s upper folder you can run cd ../, one dot specify the current directory and two dots specify the upper directory, so if you are at /var/log/ run the cd.. will take you to /var folder
mv - this command help to mv file from one lication to another, and also used for changing file name.
rm - remove some file. please note to noe use the command rm -rf /, the / alone in the linux world is the root folder which contain everything on your system, so this is why that command are dangers.
 Figure 42 Don’t drink and drive.
mkdir - create new folder.
cat - print all of the file contents on the screen.
more - the same as cat but with more you can control the view speed, and read line by line.
head - print the first line of file on the screen.
awk - this is pattern scanning and text processing language, we use this command for manipulating data and generating reports, as example we can read file and print it on the screen with the {print} option.
 Figure 43 Using awk to read file.
grep - search for specific string, if you run cat on some file and want only to see every line that contain machine word, then grep can help you, you just need to pip it and write what you wanna search.
1
cat /var/sys/file.log | grep '2019/04'
wget - this command is non-interactive network downloader which means that we can use this command to download something from the Internet on the command line.
cat - used for cut a part of string, display it or display the string without the cuted part.
sort - used for sort some list we want to display.
uniq - display multiple string that repeat it self as uniq with a number of how many times this been repeated.
man - if you ever need to know how some command work and what is the option for this command, you can check it with man page.
> - output redirection, we use this sign most of the time to save output of some value from the command line to file. you can redirect for other purpose, but most of the time this use to get out the value to file. As example:
In that case I used redirect to output the echoed string to file. If this file are didn’t exist, that it create it, if the file are exist, it overwrite it.
Types of redirection in Linux shell.
Redirecting is divided into several options that exist in the bash world besides what we have seen so far
> - Output redirection (STDOUT), as we already saw, this redirection used mostly to save output to file and it overwrite the same file if it already exist or he will create the file.
» - This redirection option is the same as the previous one, the only different is that this redirection doesn’t overwrite existing file, but it adding the output to the existing file. if the file doesn’t exist however, it create it.
< - Input rediration (STDIN), this redirection take what you want to redirect and push it to some program you may have, as example, do you remember the ssh script we use in Challenges 1? I changed it to support STDIN redirection and now we can run it as follow:
1
./script.sh < ssh.txt
On the ssh.txt you can find the line ssh://172.16.0.180/. To support STDIN I used read inside while loop, in this case it read the file line by line, each line are execute against my rest on the script which open ssh and run it with the url IP.
 Figure 45 My new STDIN ssh script.
1
2
3
4
5
6
7
8
9
10
#!/bin/bash
while read url;
do
	protocol=${url//:*/}
	machine=${url//*:\/\//}
	machine=${machine%/}
	echo 'connect to '$machine
	/usr/bin/gnome-terminal -e "$protocol $machine"
done
2> - Error redirect (STDERR), this is used to redirect the error out, lat’s say that we run some program and this program will print on the screen some information, than it if have some error redirect it.
Write your won script in BASH baby!
As you are supposed to know so far, the commands I have presented are used in bash language, which means that if we write some script there is a mode that we will use one of these commands.
When talking about scripts we often use repetitive things, that is, if you know Python or JavaScript it already gives you a good basis for programming language in general and scripting language in particular, the principles are repeated in every language, only that each language has its uniqueness and each language usually brings A logical part that is not found in another language, after all that is the reason why there are so many languages.
If you have already programmed in the past, you probably know what Boolean value is, what is function, if & else queries, loops and many other repetitive things in programming languages, if you do not know then there is nothing to stress, it means it is time to learn and if you have already started Linux, then enter the bash world.
I think the best way to learn about bash is to read some articles or watch a video on the subject and then do some challenges to help you get better and understand how it really works, a site I can recommend is hackerrank, where you can find interesting challenges.
If you have completed a number of challenges and returned here to move forward or if you already know how to write your own scripts, let’s see how it can be used to find information, or even sensitive information that we can later use to perform some action as part of an intrusion test.
Let’s say we want information from the CheckPoint site, and we want to take out all the links or URLs that appear on their main page, convert them to addresses, and print those IP’s on the screen with a display on each address how many times it repeats.
The first step is to use wget to get the index.html of CheckPoint site.
1
wget www.checkpoint.com
On the current directory we will find new index.html file that we going to manipulate and use grep to get out the information that we need from that file.
1
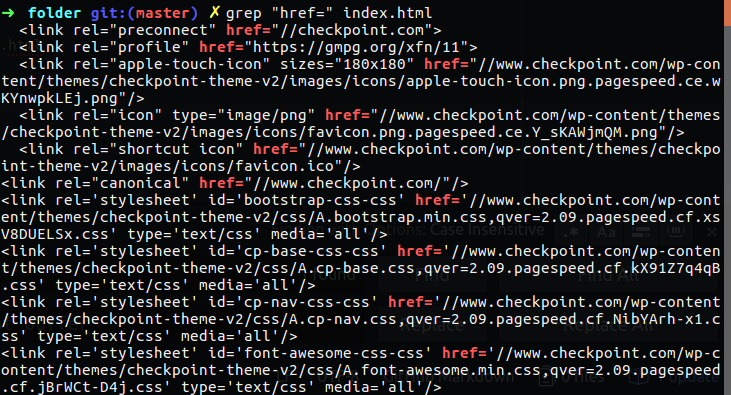
grep "href=" index.html
Now we want to take every line that contain href and display only the like that specify, to do so we can use href.
1
grep "href=" index.html | cut -d "/" -f 3
The problem so far is that we can get on our list unwanted string like as follow:
1
2
3
4
5
6
7
8
9
10
11
12
13
leadership
investor-relations
">Press Releases<
news-coverage
careers.checkpoint.com
contact-us
www.facebook.com
twitter.com
www.linkedin.com
goo.gl
">Copyright<
privacy
a><br>
So we need only domain name, to do so we going to use grep again for print out only string that contain dot ..
1
grep "href=" index.html | cut -d "/" -f 3 | grep "\."
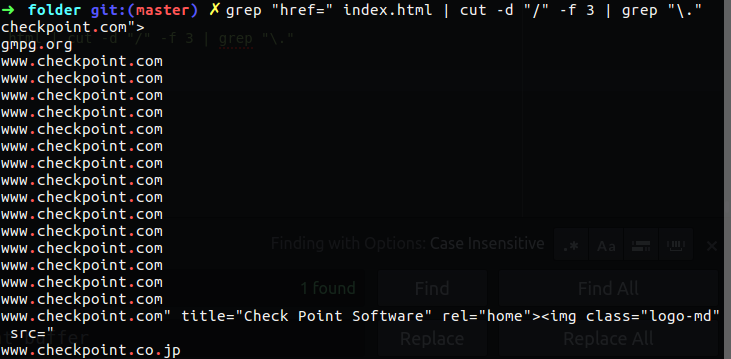 Figure 48 grep the dot from the list.
The issue we have now is that we have some line that contain chars like > and so. What we knew that every href link ended up with quotation marks, so we can use it to cut out that string. We also want to sort it by Alpha beta.
1
grep "href=" index.html | cut -d "/" -f 3 | grep "\." | cut -d '"' -f 1 | sort -u
Now we wanna to to check every domain address what is his IP address, first of all becouse we wnat at the end to view how much address repeat itself - this is why I remove sort. I direct the output to file named list.txt, and after that we will manipulate that file to get the IP’s of every domain.
 Figure 50 Redirect the output to list file.
Now it’s time to find the IP’s of each domain, I’m going to use bash script with for loop that check out every domain name and that check with the host command what is the address.
After I have list of address, I want to see only IPv4 address, so now I am going to use grep again and pull out only the addresses I needed with cut command. Also I will check uniqueness on this list and check out how many time every address repeat itself.
 Figure 52 For loop with other bash commands.
Challenges 2
- Write script in bash that check on you network how is connected.
- Write the same script, but this time in other scripting language (like nodeJS or Python)
- Check if there is a different between the output of your scripts.
- If you find differences, verify them and fix them.
1. Write a bash ping script
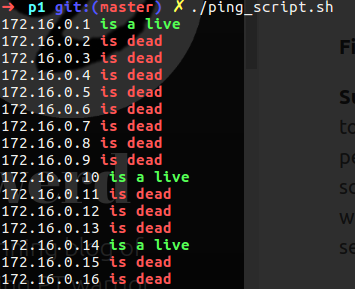
I came up with the following bash script, it check with ifconfig the network address and ping every host on that network, if that host respond the script print on the screen the network address and tell us if is live or dead.
1
2
3
4
5
6
7
8
9
10
11
12
13
14
15
16
17
18
19
#!/bin/bash
# take only the interface ip address and save the only 3 first octat
ipaddr="$(ifconfig wlp2s0 | grep "inet " | cut -d "n" -f 2 | cut -d " " -f 2 | cut -d "." -f-3 | cut -d ":" -f2-)"
for loop in $(seq 1 254);
do
  #save the output in variable for using it later on
  # -q if for displayed the summary lines
  # -n without lookup name
  # -c ping only once
  # -i interval set for 0.2 second
  # -w deadline for response
  pingo=$(ping -q -n -c 1 -i 0.2 -w 1 $ipaddr.$loop  | grep pack | cut -d "," -f 3);
  if [ "$pingo" != ' 100% packet loss' ];
    #\e[1m is for bold & \e[92m is for geen while \e[91m is red
    then echo -e "\e[0m$ipaddr.$loop \e[1m\e[92mis a live"
  else
    echo -e "\e[0m$ipaddr.$loop \e[1m\e[91mis dead"
  fi;
done;
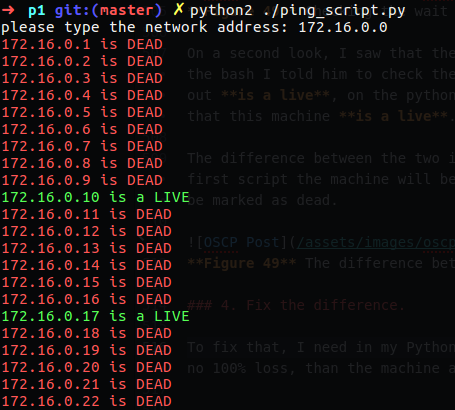
In my case you can see that I have replay from 172.16.0.1/10/14, which mean that thay are connected and working on my local network.
2. Write the same script in Python.
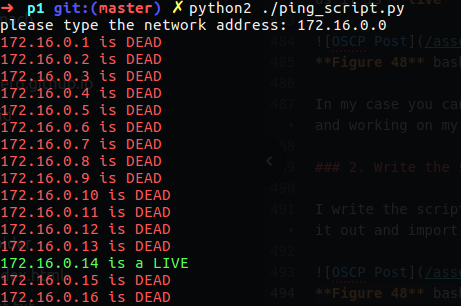
I write the script in python and I hade some issue with it to get it work, after little time I figure it out and import the os.popen to halp my to run some bash commands from Python. this time I done some popup for user can insert his network ip address.
1
2
3
4
5
6
7
8
9
10
11
12
13
14
15
16
17
18
19
#!/usr/bin/env python
import os
class bcolors:
    HEADER = '\033[95m'
    OKBLUE = '\033[94m'
    OKGREEN = '\033[92m'
    WARNING = '\033[93m'
    FAIL = '\033[91m'
    ENDC = '\033[0m'
    BOLD = '\033[1m'
    UNDERLINE = '\033[4m'
network = raw_input('please type the network address: ')
network = '.'.join(network.split('.')[:3])
for loop in range(1,254):
    respose = os.popen('ping -q -n -c 1 -i 0.2 -w 1 ' + network + '.' + str(loop) + '| grep pack | cut -d "," -f 3').read().split(' ')[1]
    if respose != '100%':
        print bcolors.OKGREEN + (network + '.' + str(loop) + ' is a LIVE') + bcolors.ENDC
    else:
        print bcolors.FAIL +(network + '.' + str(loop) + ' is DEAD') + bcolors.ENDC
As you can see only one replay I have in that case which is 172.16.0.14.
3. Check the differences between the scripts.
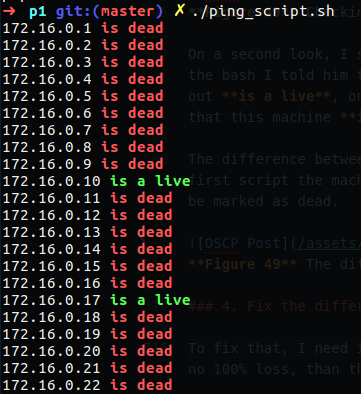
Indeed there is some different between that, because on the first script which are bash script I get respond from machine 1, 10 and 14, which the Python one I have only respond from the 172.16.0.14 address, so it’s time to check it out.
On the first look I thought that on the bash I write to wait a few seconds to decide if the ping worked or not, but there isn’t different in that section between my scripts.
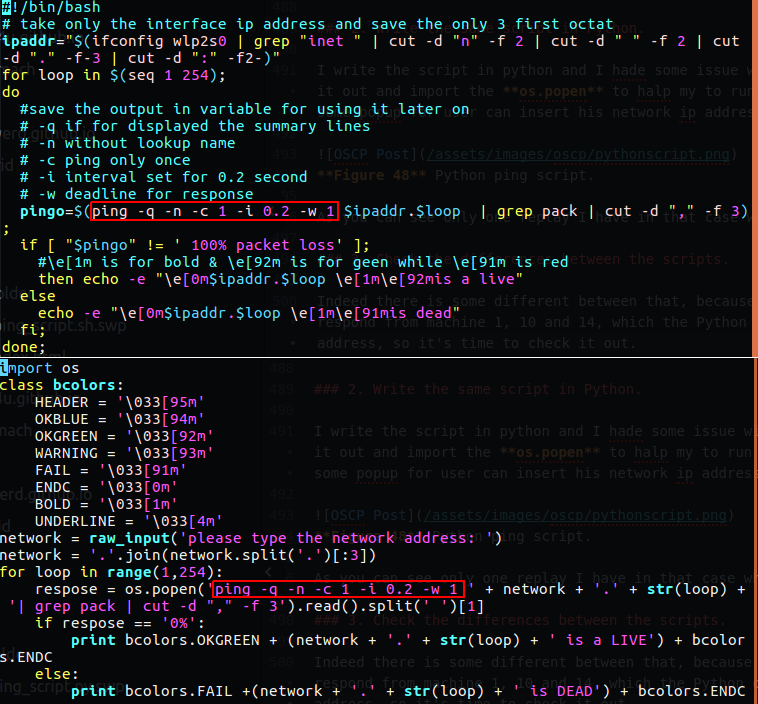 Figure 55 Checking the wait time on the ping command.
On a second look, I saw that there was a difference in the sentences if & else I wrote the scripts, on the bash I told him to check the respond and if it isn’t 100% loss than that machine are alive to echo out is a live, on the python however, I told him to check if there is a 0% loss - this is mean that this machine is a live.
The difference between the two is huge, because if I have more than 0% loss but not 100%, then in the first script the machine will be marked as live, and in the second script, in Python, the machine will be marked as dead.
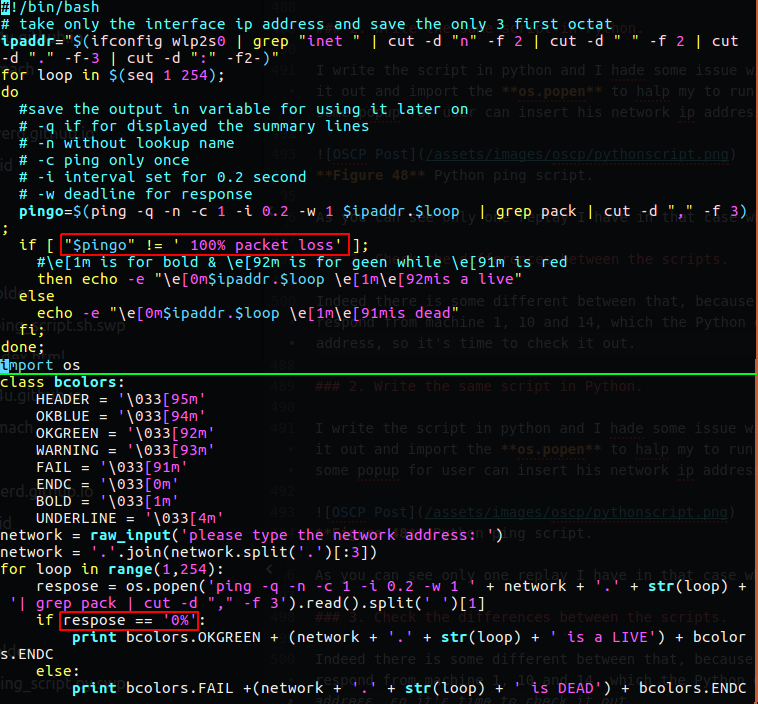 Figure 56 The difference between the two scripts.
4. Fix the difference.
To fix that, I need in my Python script, changing the condition on the if statement, only if there is no 100% loss, than the machine are alive, else it’s dead.
I’m guessing that both address 1 and 14 do not respond because it is late and people at this time leave home so these addresses are really unavailable. But you can see that in both scripts both addresses 10 and 17 respond to Ping. So we succeeded in our challenge.
Summary: It is important to know how to work with the bash command line and get to know its environment. Writing scripts can greatly help before or during an penetration test, such as preparing a work plan that will include some pre-built scripts that should help us obtain certain information or manipulate a network that will in some way Users take involuntary actions so that we can obtain confidential or sensitive information.
Chapter 3
Network tools & other cool stuff.
In the offensive world there are a number of elements we have already highlighted in the past, one of which is the application of tools that can give us data or perform network-level operations, which can help us greatly, either to obtain information, or to perform certain actions.
Netcat & Ncat
The command for Netcat is nc and according to man page that tool is used for checking TCP/UDP port that are open or listen to them. This is mean that I am able to use it to connect to some email server with pop3 like I used in telnet before.
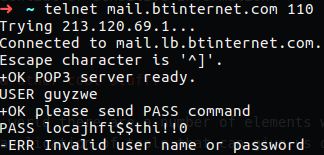 Figure 57 POP3 used with telnet.
In my case the user and password are incorrect to this is why I have an error, but what I want to say is that with nc, if we want to open connection to some mail as we done with telnet, we can do the same.
 Figure 58 POP3 used with netcat.
The -n option means do not resolve the dns, and -v are verbose, if we want to listen to some port with nc, we just need to specify the -l option that stand for listen and -p for specific port, we can also used verbose to get more information about the session, the coolest thing is that we can used netcat for chatting over the network, on one machine we need accomplish that command:
1
nc -lvp 555
One the other station, we will need to use nc to connect to the first one PC, and that everything that we will type will showup on the other machine.
 Figure 59 Netcat with two station chat.
We also can use netcat to create connection between two PC’s and transfer file using that connection, for doing so we need to use redirection.
On the server side which is the listener, we use output redirect to redirect the incoming file to our local file location.
1
nc -vlp 555 >  file.txt
On the client side we open connection with netcat and use input redirection to redirect the file we want to transfer to our netcat command, in this action we establish communication which contain the file, after the transfer will finish we will be able to view the file on the server side.
1
nc -v 172.16.0.196 555 < file.txt
 Figure 60 Netcat transfer file.
Note: in my case I used netcat from my local linux to my local linux, but I encourage you to try it from one machine to another.
With netcat we can also can make connection that will allow us to connect the remote machine terminal or in windows cmd, to do so, we need to execute the netcat on the remote machine and useing executable command which is -e option. With that option we can run netcat with some binary file that will execute immediately when the connection establish.
1
nc -vlp 555 -e cmd
Please note: that command used on windows machine, so if you trying to test it on your linux, you may wanna do as I specify below. Also note that if the nc command on windows doesn’t work, try to run ncat, or download it from nmap.org site.
On my windows machine I run the follow, by using the -e option I enable other clients to execute my cmd.exe:
 Figure 61 Netcat on windows machine.
In my machine, which is ubuntu, I run the following command to execute the remote windows machine cmd, as you can see I can run the ipconfig which is suitable only on windows which this mean that I actually successfully execute the cmd binary program on my windows machine.
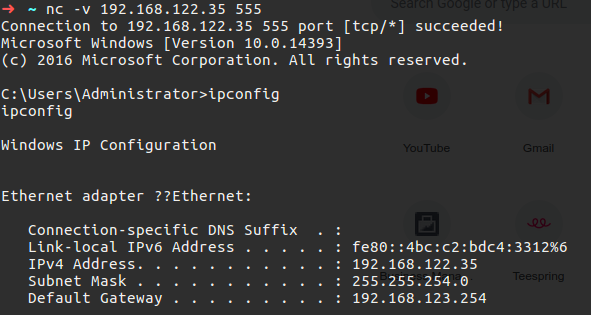 Figure 62 Execute ipconfig on the remote machine.
Now,let’s try it on my other lab, I want to run executable command on my ubuntu, and trying to establish connection from Kali linux to my ubuntu. In that case I want to show you guys that the command are different because I have no -e option in my netcat on my ubuntu, and yet it is possible to run the netcat to execute some binary on linux machine.
1
2
mkfifo fifofile
cat < /home/fifofile | /bin/bash -i 2>&1 | nc -vlp 444 > /home/fifofile
mkfifo command create a fifo file which stand for First In First Out, with the cat we use out fifofile and everything that goes into the file will spill into the cat command. On the sentence we build here we run bash as interactive which means that we going to create dialog between bash and our other command in our case we pipe it and use the bash to run everything that our cat have which going to be our fifofile, the redirect here use for redirect the error and output. in the third command which is the nc, we listening to port 444 and redirect the ouput to the same fifo file.
Now let’s demonstrate what will actually append when we will run that command our local linux machine and will try to connect it from other machine, in my case I using Kali and I run the following command.
1
nc -v 172.16.0.194 444
In my case the nc that listening to port 444 will accept the session from my Kali and redirect the session to our fifo file. Now, because our fifofile redirect to cat, this is mean that cat will try to display everything that the fifo get’s, we will pipe it and run bash on everything that cat trying to display and because bash is on interactive mode he will going to use as part of out fifofile as and spill to it the output and errors, so what we actually on the Kaly is the fifofile which implements our interaction with the bash.
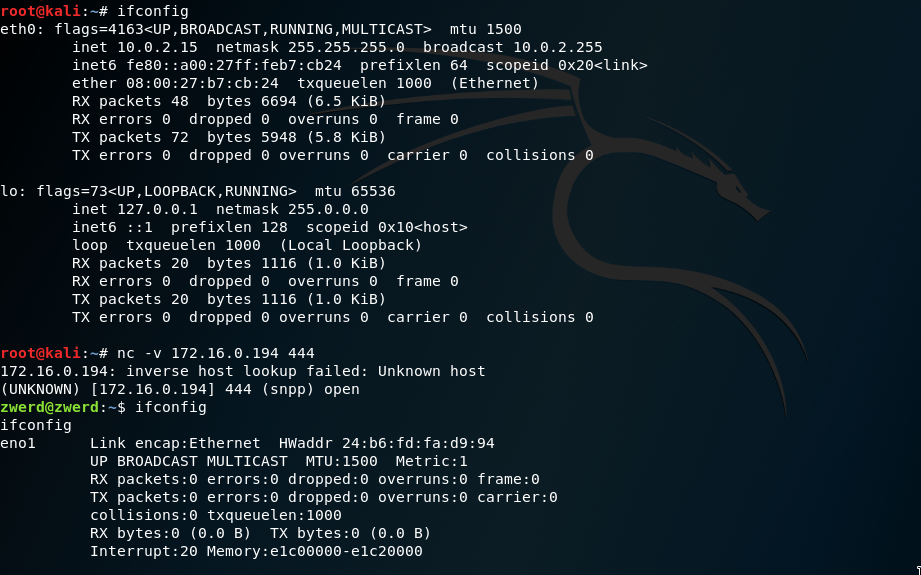 Figure 63 Connection between Ubuntu and Kali and execute bash.
What I have shown here shows how creative you need to be to perform some networking operations, if you do not have the ability to do something because you do not have this option, it is important to think about how to get what we want and how to implement it. This may seem difficult at first, but after working a lot with some commands or programming language, you suddenly find yourself doing things beyond what the machine provides by default.
As penetration tester warrior you must beware for updates or other tools that can help you to accomplish you need better than what you have so far, in our case the ncat is the upgrade of netcat, in that command we have more advance options like –ssl which can implement a session with SSL encryption and that can prevent eavesdropping, and possibly even IDS detection.
If we want to execute some program with that command we will need to run –exec, we also can allow only for specific host to connect our machine with –allow option, we also have the -v -l or -n option as the same as in netcat.
Wireshark
If you don’t read my old post, you may not know that I start my journey on the networking world or be more precisely Cisco networking world, I done everything I can to troubleshot some issue or problems that related to networking several years ago with Wireshark, this tool can help you see every ession that doesn’t encrypted over the interface that through him you grab the information, with Wirshark we can look at the session closely and trying to use the information for troubleshot and solve problems. In my case I used a lot to troubleshot TCP connection that was filed, in other case I look at connection to some site that will display correctly on one PC but not on the other, in third case I and my firnd treid to figure out way some VPN tunnel does note going up and so on.
If you want to see an example you can view my old TCP post that demonstrate the TCP connection by using Whireshark.
As a pentester you will want to use Wireshark or other tools that can sniff the network for learning about the network you going to test, so there is a several thing that can help if Wireshark are new to you, Wireshark is build Capture Engine level, and the level are done as follow:
- Network > Capture Filter > Capture Engine > Display Filter
Network - We sniff every packet that came on the network interface, this include packets who leave the local machine and packets that transfer into the local machine, if we sniff in that level, we will be able to see every packets that transfer through our port in or out, without any filter. As example on network device like router you can run some packets capturing and after you finish you can display if on the machine itself or some other third program like wireshark.
Capture Filter - in that case, the network level have some filter capturing, so this is mean that after we will finish our sniff, we can only view the packets that were compatible with our filter, this can help you if you know that you need to take a capturing for long time and you want to capture out only specific things that can help you to investigate what you need. In the case of wireshark you will only see what your filter catch in and what you specified on your filter.
Capture Engine - this refer to third party program like wireshark, you run it on some OS and capture above the Capture Filter, this is mean that if there is some filter on the local interface above the network level, on the wireshark we won’t be able to see other that that the filter catch.
Display Filter - this is filter that we done above the wireshark, which mean that on the wireshark GUI we will filter out what we need from the capture file.
In the follow up example I open up my browser on Kali and tried to connect to some website, if some one sniff the connection, he will be able to see that my machine done DNS query for zwerd.com, after that there is start of TCP session which is three way handshake and then he ask for / which is the index.html which will done with the GET command.
 Figure 64 DNS query and TCP session.
As a man in the middle we can also grab some information about the session that I saw on the wireshark, as example if we right click on the http packet and press on display HTTP stream, we can view the all HTTP steam that include the HTML that the user tried to get, some information about the source machine, like you case see that this was generate from linux machine by using Mozilla FireFox 60.0, also from the server respond we can understand that zwerd.com are hosted in github.com, we can also extract the html that the client get and run in on our local machine.
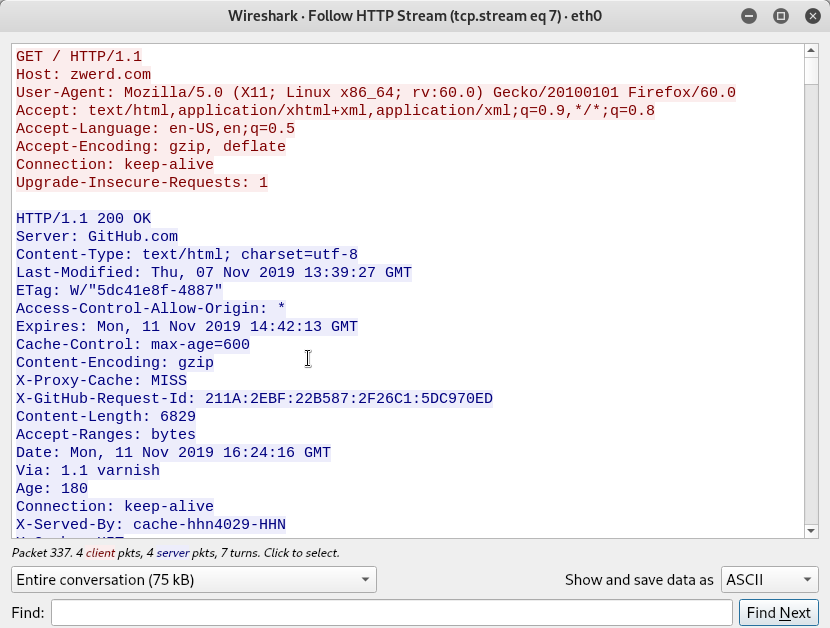 Figure 65 HTTP session GET command.
So, it’s very important to know tools like Wireshark, you will use it a lot to understand what are the things you are going to face against the existing network protections you are testing. Finding information can greatly help with further assessment, as you understand how the environment is built you can draw conclusions that you can use in the following actions, and Wirshark is an integral part of this concept, knowing that it can give us a lot when you know how to use it wisely.
tcpdump
The tcpdump are used as the network level, we can use Capture Filter on that level and if after that we save the file, we open it with wireshark we will see only what was match to our filter.
If you read the ptwithkalilinux.pdf there is an example that done with file named password_cracking_filtered.pcap, this file was taken on a firewall and that is a capture of network activity that contain some session https://admin.megacorpone.com:81/admin.
We can run tcpdump to read that file with the following command:
1
tcpdump -r password_cracking_filtered.pcap
 Figure 66 Using tcpdump to read the file.
Let’s say that we want to read field number 3 on each line and sort it, doto so we will run the following.
 Figure 67 Using tcpdump & bash commands find specific information.
This is way knowing how to use bash commands can help you to extract some information that you need as we saw before, in that case I use -r for read the file, -n don’t convert addresses, I pipe it all to awk which help me to view specific field with -F and for the field separator I use space and frint field number 3, pipe again and sort with uniqueness line -u, after that all we used head to display the first lines only.
We can also use tcpdump to view source host and checking out what he tried to do, as example of host 172.16.40.10
1
tcppdump -n src host 172.16.40.10 -r password_cracking_filtered.pcap
In the case of password_cracking_filtered.pcap file, we looking for the session between source host 208.68.234.99 to destination server 172.16.40.10 using port 81 which are the megacorpone corporation as you will see in the PENTEST labs. We can use the -A for print each packet in ASCII, we also want to see packets that contain PSH flag on the TCP segment,so we use tcp[13] which is the 14th byte (0 are also included), more can help us to control the displayed on the screen.
1
tcpdump -A -n 'tcp[13] = 24' -r password_cracking_filtered.pcap | more
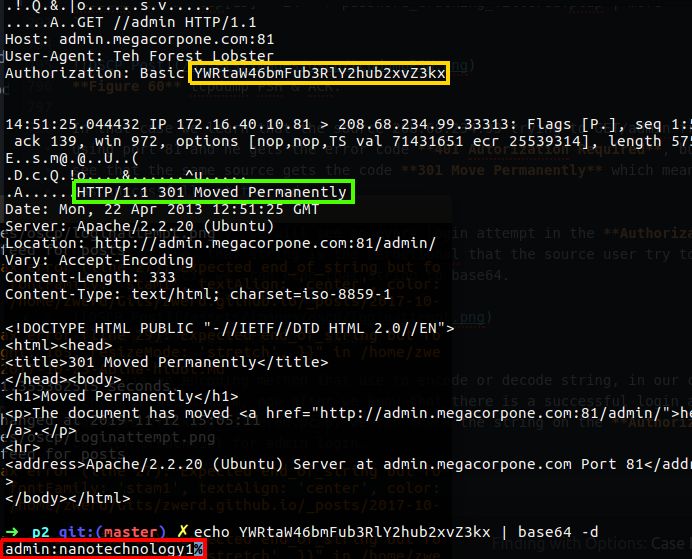
In that case we learn that the source 208.68.234.99 trying to GET/admin from admin.megacorpone.com using port 81 and he gets the error code 401 Autorization Required, but if we look further we can see that the same source gets the code 301 Move Permanently which mean that the login to this page was successfully at the end.
If you look closely, we will see on every login attempt in the Authorization that have some bizarre string, that string is the cerdetional that the source user try to use in order to login, to view it as ascii we can echo that string to base64.
 Figure 70 Login attempt & base64.
Base64 is an encoding method that use to encode or decode string, in our case we decode it to see the string in ascii form, now after we know that there is a successful login attempt in that password_cracking_filtered.pcap, we can check the string on the Authorization field and find the correct credential for admin login.
Now we surly know that the user in the case of code 301 use the correct username and password, so after we use the base64 method to decode the string, we know what is the correct username and password to login that web server:
username: admin
password: nanotechnology1
Challenges 3
In this challenge I use my Kali Linux, if you have not yet install Kali on virtualbox or as virtual machine I recommend to do so, but you can practice this challenge on other machine like any kind of linux or windows server.
- Download the this login form to your machine, this is an html with login page.
- Transfer this file to your Kali Linux machine using netcat or ncat.
- Run apache2 on Kali and bring up site with the login.html as the main index.
- Open wireshark on Kali and start to record the packets of your Kali interface, and try to login the site from other machine.
- find out the packets that contain the username and password you type on the login page.
Now, please try to this challenge alone, after you done and successfully found the username and password you can jump to chapter number 4 or read the solution I specified here down below. let’s get started.
1. Download the login page.
This login page I found over the network and in this login page you have style section already written and javascript section inside that document, the idea of this exercise is to find the username and password you type on the login page by using wireshark.
2. Transfer login.html to Kali using netcat
I start up my Kali machine and checkout what is my ip address with ifconfig.
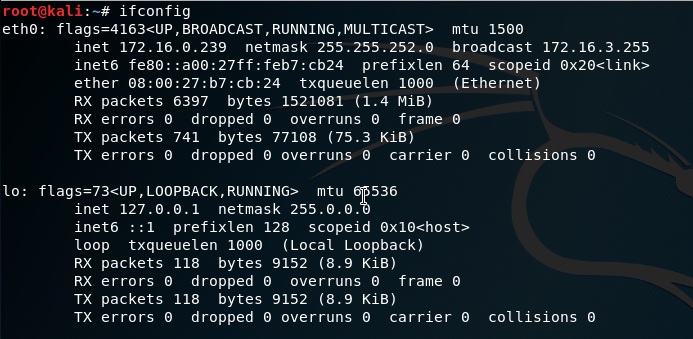 Figure 72 The IP on my Kali using ifconfig command.
Now that I know that my ip address is 172.16.0.239, I need to start netcat on my kali, I am going to use netcat as server side inside my Kali and redirect what he gets on the session to file named login.html on the www folder.
On my Ubuntu I run the netcat and used redirect input with nc command, this action will trasfer the file to my Kali machine.
 Figure 74 netcat on my Ubuntu.
As you can see from the screenshot of my Ubuntu, the connection was establish successfully, so let’s check that we have that file on html folder, I used the ls -l command.
 Figure 75 Login file are on my Kali.
3. Start apache2 and check login page.
On my Kali I start the apache and check to see what is the default webpage that I get.
1
service apache2 start
 Figure 76 Cant see the default page.
I checked on config file, and found that the default can be found under port 8081 connections.
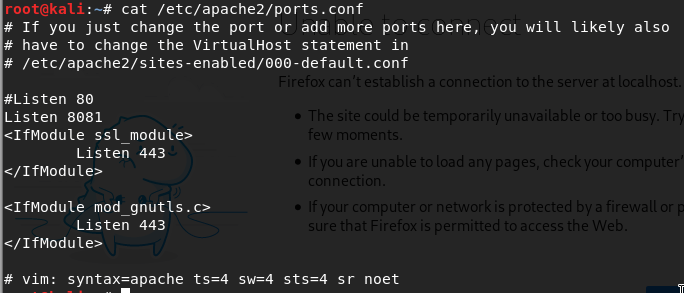 Figure 77 Config file of my apache2 service.
I tried to connect my Kali by using port 8081 and I got the old page from challenge 1, I have teo option, chenge the index.html to be our login page or change on the conf file to bring up new default index file which going to be the login.html.
 Figure 78 My default page from challenge 1.
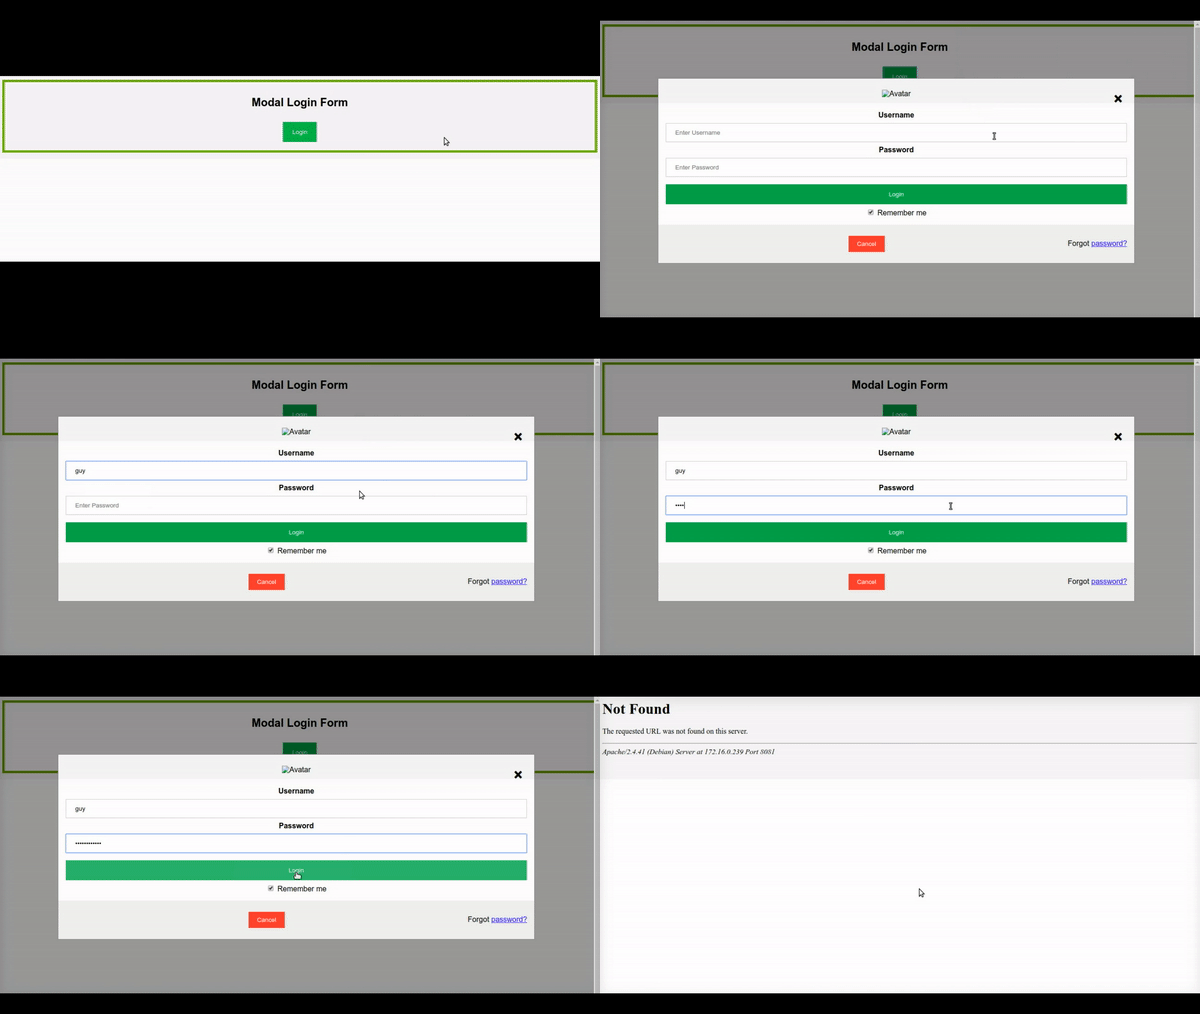
I decided to change my index.html and Instead of writing SSH it will be written LOGIN. On the index file I add up the lines needed for it to work properly. Also I restart the apache2 server in order my page will absorbed.
 Figure 79 My login page as the default.
Now I can trying to move to my Ubuntu machine and check to see if I get that login page.
4. Start wireshark and record the session to login page.
On my ubuntu I opened Wireshark with sudo privilege, and start to capture on my local network interface to see that it active and I have traffic.
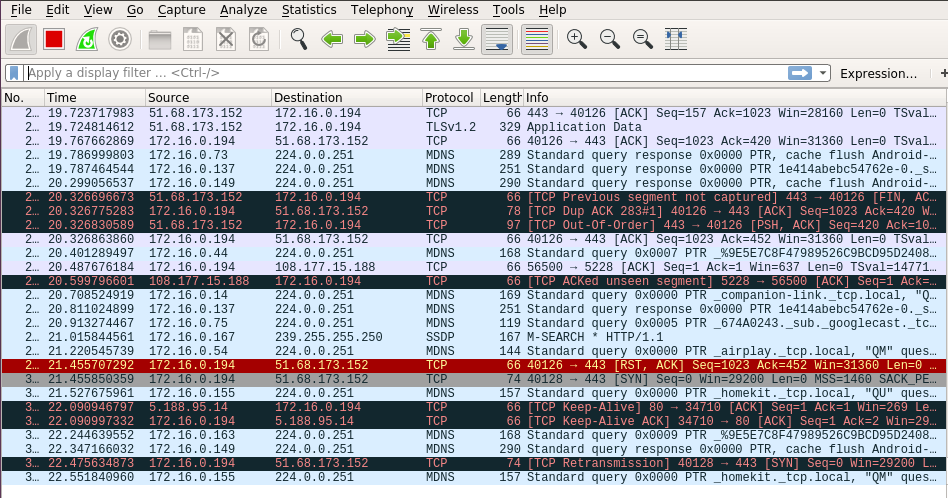 Figure 80 The wireshark on my Ubuntu.
As you can see it working so I opened up my browser and tried to connect my Kali using 172.16.0.239 address with port 8081.
let’s check now if we can login.
The login faild becouse I don’t have the action file that need to take the username and password and check them over the database. but this action that I have done send the username and password to my Kali server anyway.
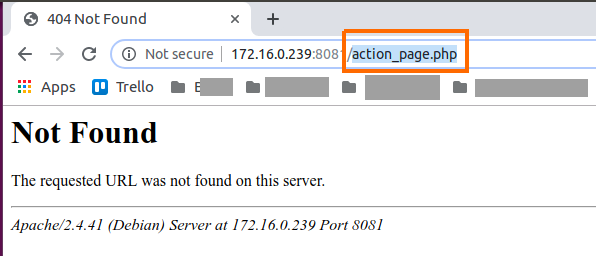 Figure 83 Have no action page on my Kali.
5. Find the User & Password
I stopped my wireshark from sniffinig, It’s time to check if I can find the user and password over my capturing record. I run the following filter to view only the connection from my Ubuntu to the Kali.
1
ip.addr==172.16.0.239
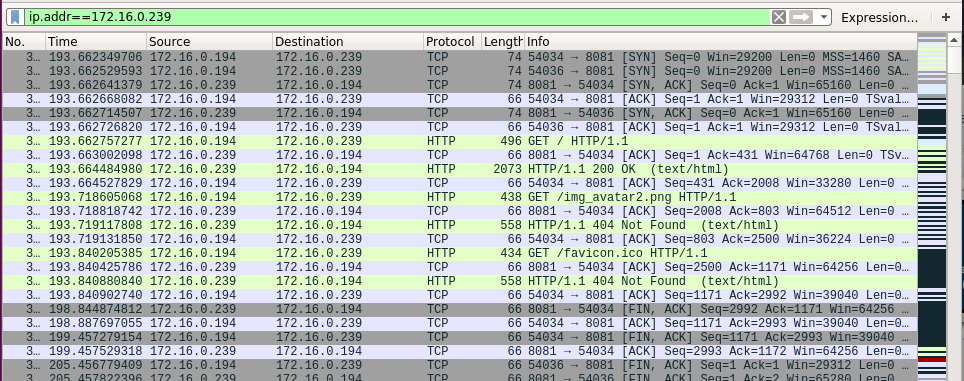 Figure 84 We can see the packets.
On the wireshark I have the record of the session I done from ubuntu to Kali, I can see that I tried to get the default page and the /img_avatar2.png which I don’t have it on my Kali, this is way I get 404 error code on that action, I flipped further down and found the part related to the action page that I tried to POST the server, this action was done by click the login button, I opened the details and saw there the Form which contain the username and password that I typed.
 Figure 85 The captured user & pass.
Summary: if we want to login to some server over the world wide web, it’s a good idea to check and see that we use some encripted connection to that server using https, it also imported to see that certificate we use to encrypted our session to that server is update, if it’s doesn’t it is likely that your browser will warned you about that, If you do decide to go and proceed to the site anyway, you should not login to this site because the same situation we saw here, if someone is listening to the network (Man In The Middle) he can certainly see your username and password.
Chapter 4
Information Gathering Explanation & Action
Information gathering is importance step to know before we going to try break to some organization that you going to penetrate, in that step we can trying to get more relevant information that may give us a clue what we going against for, I mean surly you may find some phone and fax numbers and email addresses but you may find more interesting thing like what the service provider of that organization, what email service they use, is that email service are old? maybe you can find some exploit to that service and so on, mean, can you see were that is going? that information can be useful as more you proceed to hack the system.
The way to find some information can be done by using some search engine or tool that can be found on your Kali, if we talking about online search engine, it may be a good idea how to use in google, you may read that line and say, “google? rubbish… nonsense! what I have to know about search on google? I just search it!”, this is the point, in google as example we have word key that can maximize your results and find exactly what we are looking for.
Google Search Power
In google we can use keys parameter for running the search we want, this is a sort of filter that can bring the most relevant results that can help use to achieve the information we want.
The way you use the keys are as follow:
1
key:<search word>
inurl: this option allow us to search specific word inside the url, this can bring us some url structure that can be vulnerable to some attack like sql injection or xss etc.
intext: this key can help us to search inside the body of the webgparg on in the source code, in that way we can search information that can been found over the source code of the page, we can find that this site bulder as example use particular hoster service that can be found vulnerable, or script code that build over some specific application that can seen vulnerable or worse, the site builder can leave a comment that can give us clue what the service that he use and what are the version of tham an if so we may recognize some weakness we can take advantage of to carry out our assault.
filetype: this option can been used to find specific file type on the site, if we found some file that we know what is the version of it, we may use it to exploit this site.
- intitle: that option can found specific text inside the title of that web, this can be good to file some related things to that side, like lets say we want to find the admin page or more correctly admin directory, we can use the follow:
1
intitle:"index of /admin"
if the page admin contain some default view that is index of folder that title will be this page title so this option are handy.
- site: that option can help us to search some string inside the specific site we used on our search, as example let’s say that we done the following:
1
site:cisco.com
Int this case this can bring us all the results that come from cisco.com, we can combin other option with that option to find more specific stuff on this particular site.
link: this option can be used to find site that contain like to others, this can help us to find more information related to this site structure.
- -(sub tract/key) this option can be any key we have, but with the -sign which tell the search engine to find everything excluding of our specific string, as example:
1
site:cisco.com -site:www.cisco.com
In that case we bring up results from cisco.com but exclude results related to www.cisco.com, that way can help us to find more relevant information.
We can combine every key with others and that action can bring us interesting things, let’s say that we search for passwordm we can run the follow:
1
inurl:passwd filetype:txt
In this example we search in google every url that contain the word passwd which have file type of txt extension, that can beeing handy if we try it on specific site lite let’s say books24x7 which is site for book reading.
I run the following:
1
inurl:passwd filetype:txt site:books24x7.com
And sure enough I found that this site contain some txt file with password.
 Figure 77 books24x7 passwd search.
I don’t know way some one do such a thing, bring some open txt file to your site is not clever, so it may be a good idea not to do so.
You may know about some title that appliance bring up, as an example, I know that my friend who work at some hotel, have some camera that view on the main entering from the down street, on that appliance the title is Live view and that camera is of axis, so I run the following just to see if some one over the net have an open access to this sort of camera:
1
intitle:"Live View" "axis"
That will bring up some site that have AXIS M1114 Network Camera of Heidelberg University on Germany which locate above some foucault pendulum,
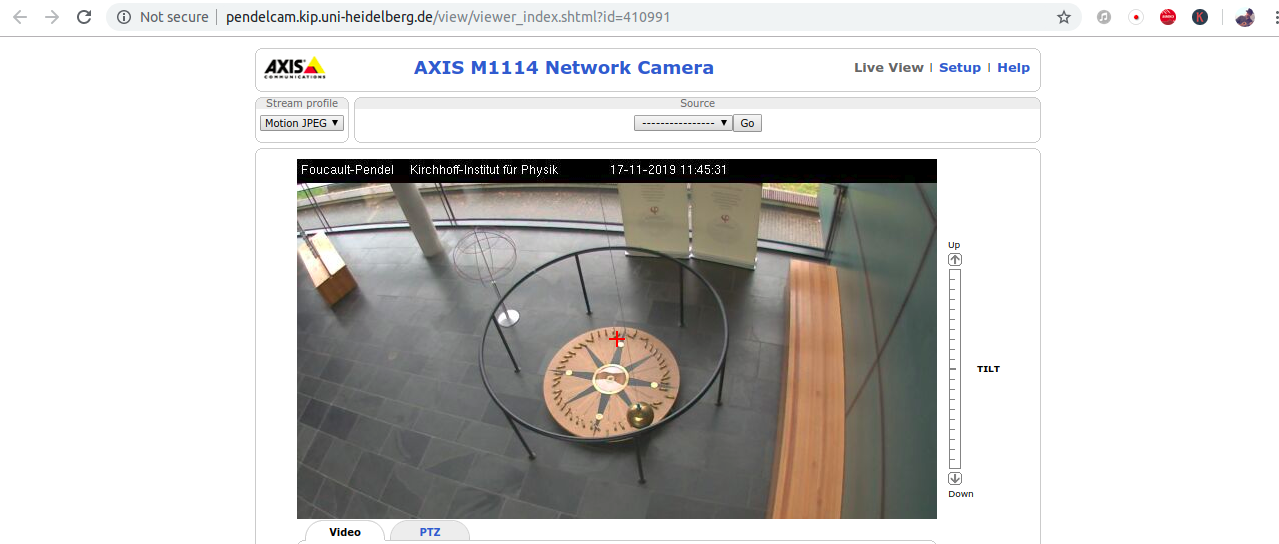 Figure 87 Foucault pendulum on Heidelberg University via AXIS M1114 Network Camera.
Let’s say that you came up to some organization and saw at the entrance some camera with logo or title of the company that sell that camera, maybe some simple search on google can give you how the managment of that camera look like and you may found some key that can be used on google and maybe you will find some free access to that comera, and if so, may be the camera is a part of their network and maybe you can advantage this case to penetrate in.
| It’s can be handy to know that with google we can use regular expression like “or”=** | , Or more targeted search by using brackets **(), like in the following search: |
1
filetype:pwd inurl:( service | authors | administrators | users )
Do you see which way this is going? So it’s worth knowing and familiar with the tools available to us when it comes to a search engine like Google, which can be very useful to us.
Email Information Gathering
When it came to emails, we can use google to find email by domain name, but we also have some tools that you should know. In the filed of emails gathering, the export name is Email Harvesting, like thehavester that can be use to done search task for email that related to some domain.
thehavester
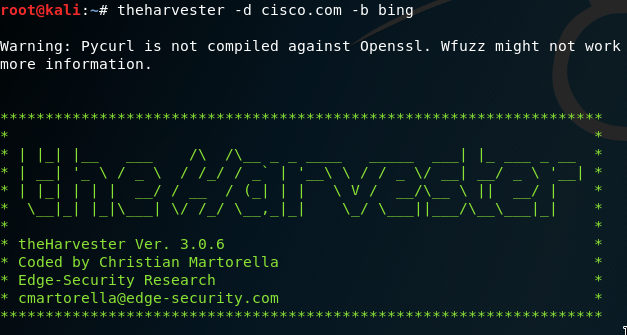
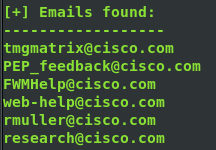
That tool can search an emails by using Google, Bing etc. When you trying to run some search with that tool he actually run GET command over that engine to search the email address that related for that domain, for example, I run that tool for searching over google emails that related to cisco.com domains
1
theharvester -d cisco.com -b google
the following is what thehavester was sent:
1
https://search?num=100&start=0&hl=en&meta=&q=%40%22cisco.com%22&User-Agent=Opera%2F9.80+%28X11%3B+Linux+i686%3B+U%3B+es-ES%29+Presto%2F2.8.131+Version%2F11.11
if you will try this like on your browser you will get some search page for cisco email that look like that:
 Figure 89 In my case I search for cisco emails.
I didn’t get any results on theharvester, if I run wireshark I will be able to see why,
You can see on the wireshark that I get error code 503 which is unreachable page, I cannot recover this request over the browser, but I can see how the search is look like, any way, we know that theharvester use http request and not https, maybe that is why we get 503, but know let’s try it on the bing.
1
GET /search?q=%40cisco.com&count=50&first=250 HTTP/1.1
On that GET request we can see clirely that we trying to get results out of 50 counts which mean that the page we get will contain 50 results at one page and the results number is the first 250, this is mean that the page contain the result number 250 and display you the rest of the 50 related results which mean 250-300, please note that in bing the max is 45 results per page.
At the end I got number of relevant address that theharvester found by using bing as search engine. the following are the most used option:
d - domain name, we can used this option to specify domain name or company name, theharvester will use that in his search over the search engine.
b - database, with this option we setup the search engine like bing or google or censys, theharvester will used the search engine we setup for all of his searching, you can also run double search engine by using comma as separator.
l - limit results, in case you have many results of one domain, you can limit them by using this option, in bing the limits are 50.
f - this option allow you to save the results in xml format, you can elso redirect the result but with that option you be able to see the results on the screen which you can’t with redirect.
whois
That tool can be use to find out which is the service provider of site, when you run this command on your Kali this whois start TCP session to whois database with port 43 which is the standart tcp port for whois, the details you get you can also get on www.whois.com which is the same database. The information whois can give you can contain address and email address for the organization you search for and phone number and street location, also ISP for that domain and date of update/created and so on.
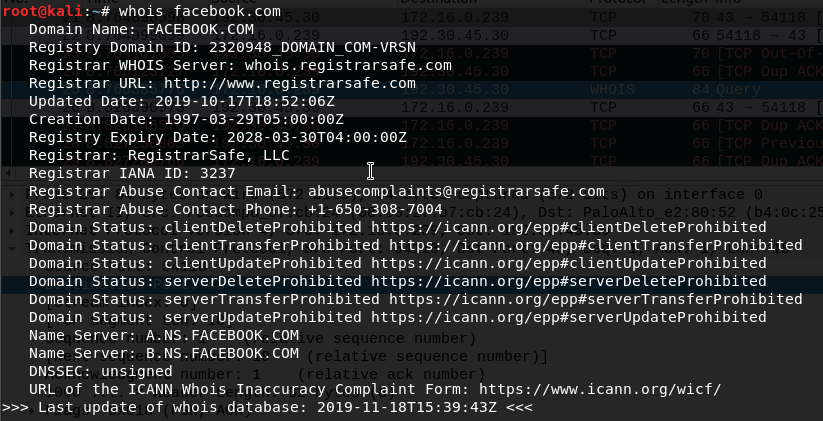 Figure 92 Whois tool, facebook search.
you can also use IP address instead of domain name, whois can performe reverse lookup and find out more detail related for that domain.
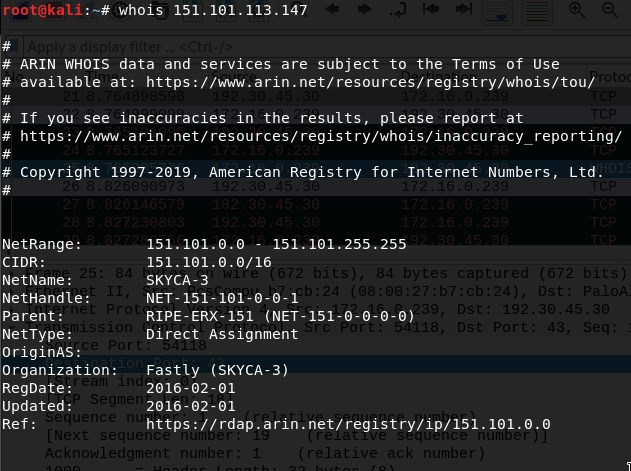 Figure 93 Whois reverse lookup.
recon-ng
That tool is look like Metasploit Framework and feel in that way, we can use it to grab data about our target for using it later on or finding vulnerabilities. recon-ng use modals that we need to operate and setup what we need in order to make some task over the network, after we done to setup our need we use run command to start the scanning.
But before we look at that tool, you need at least the version I use which is 5.0.0, if you don’t have that version, the command I will going to show you here may not work for you. To install the latest version you can use the following command:
1
apt update && apt install recon-ng
If the machine complain about that you have the latest version, you may want to update the source.list repository on your Kali, but you can also clone it from git by using the following command:
1
git clone https://github.com/lanmaster53/recon-ng.git
after he finish to download the source git, use cd to jump in the folder and run the the following command by using pip3.
1
pip3 install -r REQUIREMENTS
if you don’t have pip3, try pip instead, if that also not work you can install it by using the following command.
1
apt update && apt install python3-pip
Now, run recon-ng from that folder by using the current folder ./recon-ng, this will bring you that recon-ng that you download, you can see the version on the load screen.
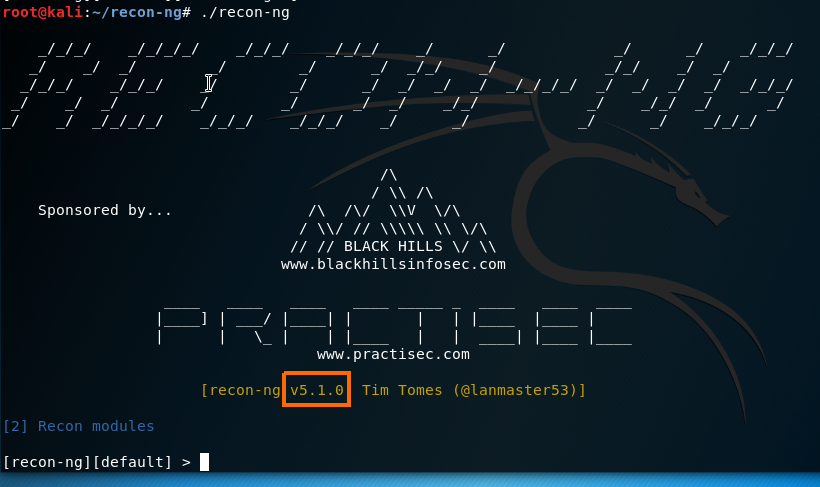 Figure 94 recon-ng verion 5.1.0.
The first thing you will want to do is to view the marketplace, there you will see every module that you can use, in my case I search for module name xssed, that module can help us to find url of some domain that vulnerable for xss attacks.
1
marketplace info xss
After you find the module, you will need to install and load it up it by using the following
1
2
marketplace install xssed
modules load xssed
After that done, you can view the option you can set into that module that can be use to search that vulnerabilities on some domain by using the following
1
options list
I saw on old version of recon that the command show options are being used, on the output you will see the minitable that contain the SOURCE which is the domain value we going to use, I already set up that domain by using the following command:
1
options set SOURCE cisco.com
After that, the last thing you will need to do is to run that module algorithm on that domain by using run.
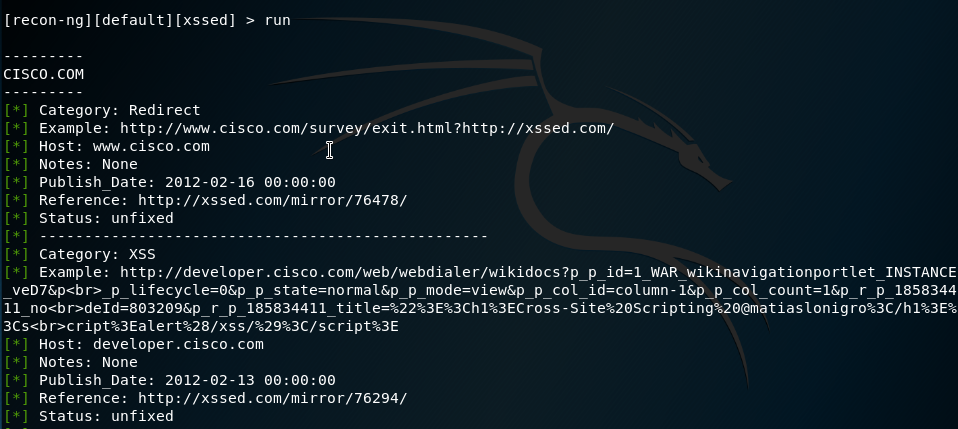 Figure 95 Using xss module in recon-ng.
You can also use info to see what already setup on that option and change it if needed. If you want to go back to marketplace and search for other module just type back and you will be able to search for modal with marketplace info <module>. please note that in the module name you can type part string and he will find the all related thing that contain that string like as follow:
1
marketplace info xss
This command will be found every module that contain xss in the name, after you load some modules and let’s say that you tryied out a lot of them, then you can use the following command to display which module you all ready load and ready for use.
1
modules search
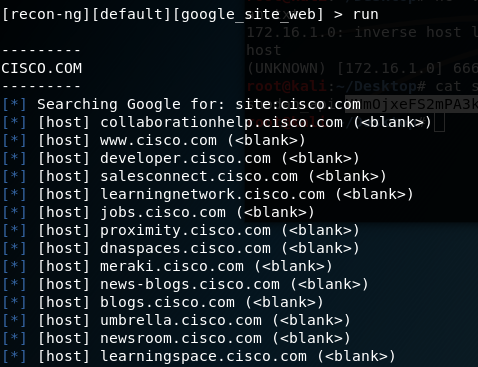
Lats say in our case of information gathering we want to find out every subdomain of cisco.com, in that case we can use the google_site_web, so first of all we need to search if it exists on our recon-ng by using marketplace search google_site_web.
 Figure 96 Search some google module on reacon-ng.
After we found that we have google_site_web module, we load it up by using modules load google_site_web, and that command will open that module for us, now we need to know how to use it.
We also can use info, in our case we want to setup what domain we will use for searching the sub domain, the command we need now is options set SOURCE cisco.com, the output will specify the new SOURCE that we going to use.
What we need to do now is just run it by using run command, on the screen you will see all information that this module found related to this domain.
You can view that information on recon table by using show hosts command. In my case I used the hackertarget to find information about tesla.com domain.
 Figure 100 Using show command.
DNS Enumeration
Using DNS is another way lunch active information gathering, DNS can help us to find information like organization servers, addresses server names and more. the usual command that can be use to make query to some DNS server is host.
In zwerd.com you can see what is the ip address for that host and what server handle it’s mail service. You can specified what type of query you going to generate by using -t and you have many, like ns or mx and such. The ns are used as name servers and it resposible for give information about a server which mean this server have DNS record for the server you search for, as example if you run the following command.
1
host -t ns google.com
In that case you can see the DNS server that contain the information about the domain google.com, you can do the same with mx recorde that will give you the name of the servers that resposible for the mail service for this domain.
1
host -t mx google.com
In case of subdomain you may see some alias record for other subdomain, in my case I run the following command host www.cisco.com and that command give me many alias for that sub domain.
 Figure 103 cisco subdomain records.
If we what to grab the subdomain and search for any subdomain that domain contain, we can use host command for every thing that we think that can be found as sub domain, like www, ftp, owa, proxy, and such, but in the case of linux you always need to think out of the box, you can redirect these string to some file and create bash script to manipulate that file.
1
2
3
4
5
echo www > web.txt
echo ftp >> web.txt
echo owa >> web.txt
echo proxy >> web.txt
for subdomain in $(cat web.txt); do host $subdomain.cisco.com;done
 Figure 104 Script for finding subdomain records.
As you can see, www can be found, and that are alias of other sub domain name, so we get some redirect on redirect (that at least how I call it), in the case of ftp we can see that cisco have a ftp sub domain which can be use for FTP service, and the last two can’t be found. So this is one way how can you create self tool that can be handy for finding such information.
In the DNS world you can advantage some misconfigure DNS server if found, recording to the offensive book author, many sysadmin misconfigure their DNS servers which can be handy if you search for information and with luck found some way to grab more information about your target.
In the case of DNS misconfiguration you can run simple host command that can give you more information about other servers that the target contain, and with their name you may understand what service such server willing to give, like in the ftp.cisco.com, in that case it look like that server are the FTP server of cisco company.
The way to grab such information with host command is as follow:
1
host -l <domain name> <dns server addresses>
As you already know, to get the server that handle the servers name in the organization, which is the DNS server, you just need to run host -t ns <domain name>, if you get some ns record this is the DNS server and that is the address you need to use in the above command.
This technique is called DNS zone transfer, this is similar to replication of database between DNS servers. So if you have luck and you found some leak DNS server you can take advantage of that server, you just need to know how to do so.
For example, take as target the domain odi-x.com, I run the following command cross that domain:
1
host -t ns odi-x.com
I found that this domain contain some dns servers so I run the comand to find misconfigure dns server, but in my case all the answers I got was REFUSED.
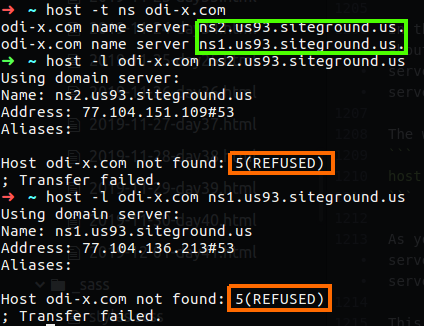 Figure 105 odi-x as target, no DNS leak was found.
But in the case of large orgnization we want to automate the process and we will write some script that can take argument as the domain name and look for his ns servers, if ns record was found, the script proceed to check if the sysadmin misconfiguration his server by using the host command as we saw earlier.
1
2
3
4
5
6
7
8
9
10
11
12
13
14
15
16
17
if [ -z "$1" ]; then
echo "[*] Simple Zone Transfer Script"
echo "[*] Usage : $0 <domain name>"
exit 0
fi

for server in $(host -t ns $1 | cut -d " " -f 4 ); do
echo "check the domain $1 and ns $server"
if [ $server != "NS" ];
then
        host -l $1  $server | grep "has address"
else
        echo "There is no NS record for $1 domain"
fi
done
Please note: don’t forget to make that file executable by using chmod +x script.sh, after that run it by using the following
1
./script.sh <arg>
In that script we willing to get some argument $1, if none of argument was entered, we print on the screen direction how to run that script. In case we have argument entered, we check it ns server, if some ns server was found, we try the zone transfer technique by using host, if we found lead on some DNS address we grep it by “has address”.
I search over the INTERNET for file that contain list of domains, and found that top50Domain.csv file, so I run the following on my terminal to use that file on the script above.
1
2
3
4
5
while IFS= read -r line; do
    domains=$(echo $line | cut -d '"' -f 4)
    echo "check $domains"
		./script.sh $domains
done < ./top500Domains.csv
I run this over to find a leak in some DNS server that can be found by using that list, and sure enough I found DNS server that related to berkeley.edu domain.
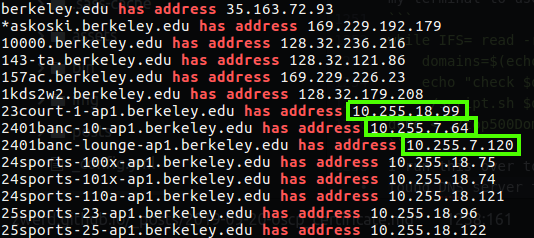 Figure 106 DNS of berkeley.edu domain, the adns3.berkeley.edu give us information.
As you can see, big part of that addresses we found contain privet addresses, and this is what that DNS ZONE TRANSFER can give us, if someone have done misconfiguration of his DNS server this can allow leak of information that potential hackers can take advantage. In our case we can actually map the berkeley University network and if we find a way to get into their network, we can use the information we found to take additional actions that can be critical to the organization (in our case - the university).I supposed that there is more DNS leak that can be found on that list, but that’s it for now.
On Kali Linux we have tools that can help us to find the same information we did found by runing our script, the first one is DNSRecon, this tool are DNS enumeration script that was written in Python, in out case we going to run that tool against the berkeley.edu domain and check out if we have the same output we saw on our script. The command we going to run is as follow:
1
dnsrecon -d berkeley.edu -t axfr
The -d option used for domain name that we going to go against, the -t stend for type and the axfr are the DNS protocol that allow us to make replication of all the record that DNS have, this protocol are use to replicate one DNS server to another DNS server and that is what the AXFR is designed to do, and because the server is not hardened properly we can replicate to our local computer, even though it is not something that should be enabled, but only to the enterprise DNS servers.
I found more records from 10.255 segment and in the list which was really long, I found the 7.120 server which are the 2401banc-lounge-ap1 server.
 Figure 107 Leak of information that found using dnsrecon.
On that list you can see that the record type specified on every line, in our case the is also MX records. CNAME, AAAA and PTR.
The second tool that we can use is DNSEnum, this tool check the domain we entered to find ZONE TRANSFER point at the organization DNS server, in my case it didn’t find any record, so it is importance to know every tool, becouse in many case this tool can be handy, but on the other cases like in my case it is useless, I run it against my zwerd.com.
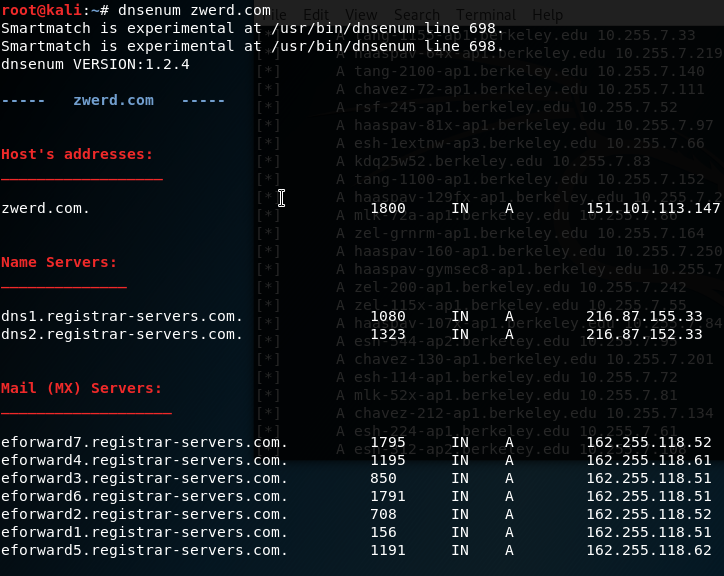 Figure 108 DNSEnum tool against zwerd.com domain.
Port Scanning
Another Information Gathering that you can perform is port scan, this action can give you a clue about service that are open and so they are in used, please remember that on the port scanning field you on the active phase like the author of the offensive security book like to call it, it’s mean that every scan you may done will create network noises, so be very very careful or some one will detecting you and stop the attack you were about to make.
As you already know TCP connection came up after tree way handshake was done, you can read more about that in my other TCP connection post, baisicly if the three way handshake end successfully it’s mean that this port we tried to connect to are open, in some cases we can know what services that port gives and that can be handy to know what is the purpose of the server at least what connection meant to be.
We can use nc command to check the connectivity by running the following command.
1
nc -nvv -w 1 -z 8.8.8.8 50-53
The -n option disable the resolutions for the hostname, the -v stand for verbose and in my case is very verbose, -w are used for time wait as 1 second and -z tell the nc not to send any data over the connection, the port that I specified are the port we going to scan over the 8.8.8.8 server.
You can see that I have succeed on port 53, so now I know that this server are open for DNS service, please note, in some cases the port you may find open may used for other service if the system administrator customize it.
On every such scan the nc done the three way handshake, if there no an answer for 1 second, the nc go to scan the next port and again he tried to open up new connection to that server with that port number.
If we look at wireshark that record my connection we will find that this connection was done over TCP and we can see the three way handshake. That’s how the nc know that this port are open.
 Figure 111 Three way handshake.
In the case of UDP, we have not three way handshake technique so in that case if the port are not in use we will get ICMP packet that complain that this port unreachable.
Vary useful tool that used for port scanning is nmap, this tool can trying to find open ports which can be around 1000 ports scan or more, but the worse thing which that tool that it is make really big nose on the network we scan with, becouse it trying to scan every port on particular machine and that can to bring us to be catch.
As example we can use nmap to see which hosts on our segment are working and connectiong to the local network as follow:
1
nmap -v -sn 172.16.0.160-252 -oG nmap-output.txt
In that case the -v option used for verbose, the -sn used for only host discovering and this is why I range it out, -oG is for grepable output which I going to grep from that file the data I search for, as example
1
grep open nmap-output.txt | cut -d " " -f2
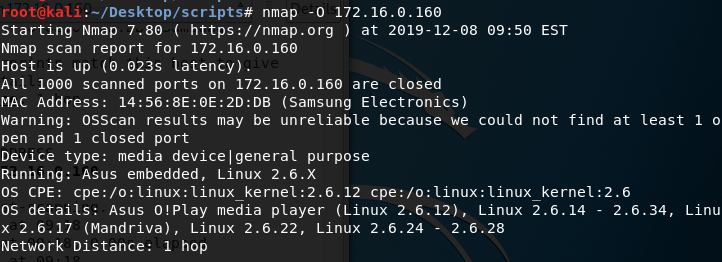
This command will cut the IP address of the machine which found as open on my scan, and this is just one way to using nmap to scan your network, you can use nmap to check what is the OS of your target by using the option -O.
In my case you can see that the device is Samsung which this can be found by the mac address my device have, and also nmap knows that is a linux device, this is done by the traffic the nmap recieve, you see, every operation system have it’s default traffic setting, like TTL value and TCP windows size, this can be hady for nmap to find the OS of the target for you.
You can also use the GUI which can bring you some nice visual graph of the network you scan


